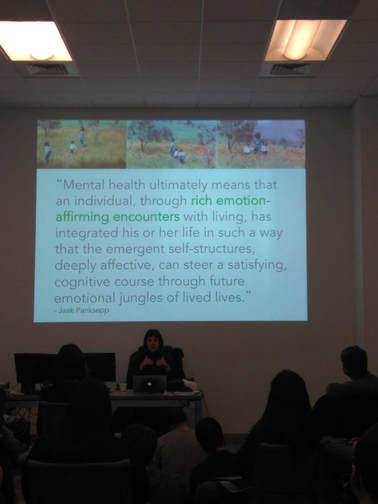
 Approach: SELF RANT: I let myself down this week, meaning I am behind; ironically it appears to be mirroring that of last years attitude towards my own track of research. This topic of sound and motion is worth my time and I should put in the effort for my research and for those who would benefit from it. I consider it to be something that would push my boundaries of what I thought I could initially create, and how these insistent distractions towards me completing my work will eventually go away so I can find time to appreciate what others would gain from my work. I need to do it for myself and that's that. Now that I'm done ranting, back to business. I feel compelled to make things right this next coming week. This last week I explore the use of MIRA in my Max-patch, but found that there is an issue with using the jit.window in the compatibility of the patch loading onto the Ipad screen. This was discouraging as I couldn't find a solution online to how I would solve this issue--but there might be a way to have the video it found stream to another window type and have this window (rather than the jit.window) be the main output of the visuals that are being observed. Choices Made: I chose this week to focus more on my mental health dealing with the overwhelming amount of work being put on me (from my own faults of signing up for studio courses), and regaining the drive that I needed in order to accomplish and catch-up on the work that I didn't complete this week prior. I went ahead (as mentioned) and began using MIRA as a means to make the interface of using Max/MSP/Jitter more friendly to users who weren't familiar with the software. While creating and interacting with the app, I realized that there is a heavy influence of interface design that is also at play here. I went ahead and made many of my objects within the patch larger so there wouldn't be an issue with pressing any buttons that didn't look necessary to touch. I also fiddled with some colors and layout, putting the whole patch on a black background and highlighting the only things that I thought needed to be considered as important. Inspirational Sources: Visual Music - Animation Studies "Music informs images just as images inform music. This sounds simple enough, it is a manifestation of an essential (yet often overlooked) aspect of perception, that of “sense-giving” and of “sense-receiving”...One could paraphrase Norman McLaren and posit that “Visual Music is what happens between the music and the images"...."Yet, if we agree with Maurice Merleau-Ponty (“Perception is constitutive”), we must acknowledge the/our all-important subjectivity as being that which provides (or not) the sense we are talking about, be it given, and/or received. We are therefore confronted by (the experience of) elements that are always in flux: if one is foreground, the other is background, and if our gaze changes, intentionally or not, the priorities change accordingly." This is fascinating to me, as I have considered heavily the influence of what was more important to the visuals and the sound playing off of each other. I hadn't considered that it should be in a constant state of flux between the two, and learning this as a consideration to the process of experimenting alleviates some of my stress to have the audio be the main facet of interesting content. This post also mentions that the "space" between images and music is, "subject to various tensions". This includes being "literal" and "equivocal". In the 'literal' sense, this is based more on the figure/ground differentiation, showing that images and music are two different 'things' to be considered. In the 'equivocal' sense, where music and image are both equals and they can both no longer be identified as separate elements, but coexist with one another within one realm of content. I would also like to thank my professor as a source of inspiration this week. Maria is a considerate and passionately driven individual in the realm of animation and research; she is a constant force for good and makes sound and reasonable decisions for herself, the department, and others. I feel as though I'm lucky to have her around and even be in the same room as her. She knows how to look at/address specific issues in design thinking, and personal woes. I considered most of the work that I was doing as a facet to pleasing others, but I need to STOP doing that. This is for me, this is about what I want to make and how I want to utilize it. Whether or not it is found interesting by others is solely up to them, but there won't BE ANYTHING if I don't get my ass in gear, and work towards my goal.
Questions Raised & Needs:
Next steps: Keep my chin up and work. Take advice from others and relax when necessary. Don't worry about what "could" be, but what I can work with at the time being. Take everything one step at a time, don't overload myself with useless probabilities and focus on what's important: Health, wife/friends/family, curiosity to learn and explore, giving myself some slack (because what I am doing isn't easy), finding the balance, following a schedule, feeding the cat-brats. -Taylor Olsen 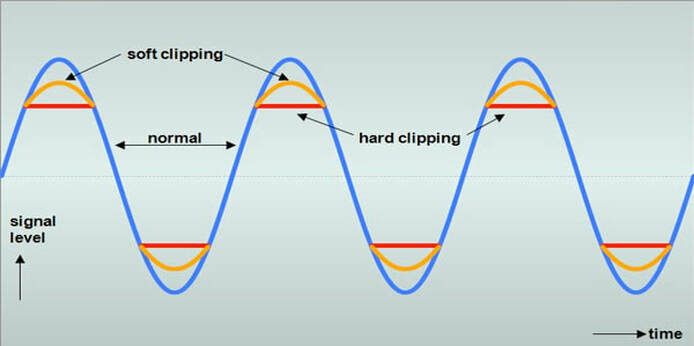
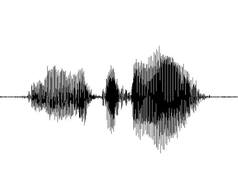
*An example of audio clipping.* (Source)
Approach:
This week I fell a little behind in my proposed progress due to some complications with my mental health. But, I did come to some realizations about how to prevent this patch from becoming too loud when having visual playback incorporated into the output. I'm beginning to understand the complexities of having too many objects on screen and how this would interfere with the digital-to-audio playback of the patch. Choices Made: The image above shows an example of how sound can be clipped during playback if the amplitude is too high with a set frequency. We can see that there are ways to have the sound become less clipped by increasing the threshold of the amplitude waveform, but this would ultimately lead to an issue where the actual hardware wouldn't be able to decode the waveform being fed into it. In sound synthesis, a basic way to consider how an amplitude envelope works is to consider it as a factor of 1 to 0. In this sense, 1 is full amplitude, while 0 is presumably "off". Something I have now considered (which my patch already does) is to have it recognize how many different shapes there are on the screen, and how large these shapes are in terms of pixel density (which my patch also does too!). When this is read, I can have the actual patch distribute the amplitude accordingly to each object. So, two objects would each have a (0.5) amplitude among them, 3 would have (0.33), 4 is (0.25), and so on. This would be accomplished by using a [target $1] command to send a message to the frequency modulation index. I am considering throwing a subtract (-.001) onto the total amplitude as to prevent any sort of clipping in the playback, just in case the patch decides, in the order of how it reads the data, to accidentally play both at full amplitude first before "snapping" them to it's distributed amplitude. I may have to play around with how this is determined though, as it could lead to some issues and may need reworking. Through observing how I can distribute the amplitude correctly, I want to consider having the size play an influence in how much of the sound is distributed as well. Having them both evenly distributed is a good first step, but having size as a factor will also be something worth considering. A larger object could have (0.7) amplitude, while a smaller one could have (0.3). Considering this, and associating it with float values, it could even be distributed as (0.98) and (0.02) depending on the size relationship of each object. Inspirational Sources: I found a new source of audio-visual inspiration this week from an individual named Max Hattler. While his pieces are more influenced by pre-rendered visuals, he uses audio to adjust and modify the visuals presented. A significant visual aesthetic is the repeated imagery. I learned from taking Matt Lewis's "programming design concepts" that this is a repeated frame-rate 'draw' function that can be adjusted and simulated to shrink/grow in size.
I've considered taking into account that if i can get this patch to work in the way that I want to, is to have an audio adjustment afterwords and a feedback loop to create even more obscure and abstracted visuals/sound. Some of the visuals are to the beat of the song, while some appear to be independent.
Questions Raised & Needs:
Next steps: This coming week I want to get back on track with my progress and begin play-testing with some basic animations that I'll created for the sake of the audio output. I'm hoping that I'll find more time on top of my other courses to further my progress for my research. Taking 4 studio/lab courses as well as teaching has started to become more hectic than I anticipated, but finding ways to distribute time is also necessary. -Taylor Olsen 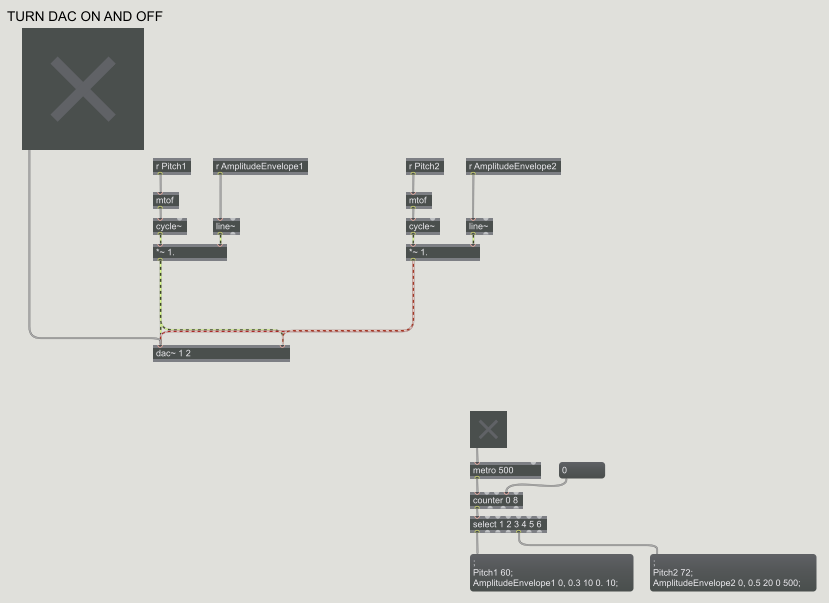 *A Max/MSP patch with the inputs of Frequency and Amplitude.* LINK TO PREVIOUS WORK Approach: For the beginning of this week, I decided to continue with my previous exploration path: the visual "Audio-izer" (link above). I want to use this as a continuation to my next phase of projects that include understanding the fundamentals of sound and visual synthesis, as well in finding new ways to explore animated loops. During my music synthesis class, we've been studying the basic physics of sound properties and how they're made; and much in relation to my field of study, this interests me greatly as I go through the same process--but there are many connections to be made between sound and visuals. Below you can find the PDF of my current proposal.
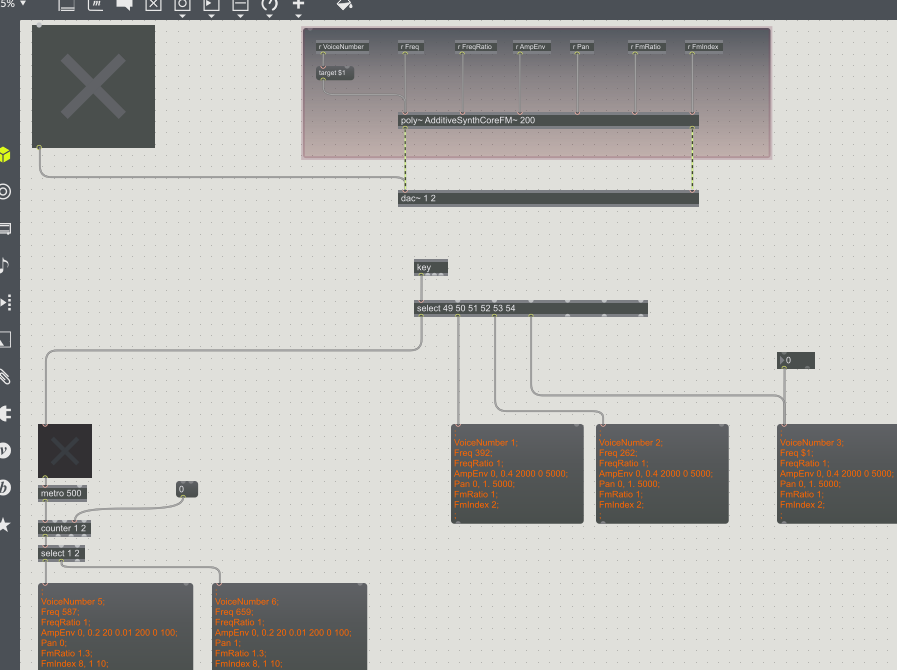 *A little more complex Max/MSP patch with the inputs of Amplitude Envelope, Frequency, Modulation, Ratio'd frequencies, and Frequency Modulation Indexes.* Choices Made: For this week I decided to return back to working with Max. I didn't get as far as I'd thought in my progress until realizing that understanding the basics of sound and how to produce it is exactly what was needed for my research. I've gained a better understanding of how sound waves are produced, and was left with a very basic and easy to understand reference found through online resources: What is Sound?  *An internal patch (referred to in this case as associated with a "poly" patch) used in the creation of the sounds for the previous image shown. Basically the inner workings of a patch, almost looks like a circuit board in my mind.* Inspirational Sources:
For this week I found an online post of a group who experimented with the synthesis of visuals and sound. I found one very interesting correlation between how they were using sound to drive the visuals: Audio Visual Synthesis "After playing with AV in many ways for some years we have concluded that the relationships between Audio and Visual streams are plastic, ie. not fixed. So in AVS there is no absolute correct mapping for e.g. colour frequency to sound frequency. The mappings can be set as required, creating relationships. Some relationships work better than others. As in real life relationships, using intuition and trial and error we (sometimes) home in on the ones that work best… " I think this quote is very important as I was never sure how I would implement what color was created by what sound. There's also the consideration of what I've began to elaborate more on: the relationship between sound and visuals is always inevitable because in simplest terms, they're both made out of wave-forms. In this sense both can have extracted values of color-to-sound that would be multiples of the frequencies presented (I would have to calculate the math, but something to consider). Questions Raised & Needs:
This next week I'll be testing these ideas as stated before for the determination of sounds. I also want to explore different ways of making the patch more CPU efficient. I should also play around more with MIRA on an Ipad to see how I can use it as an interactive device. -Taylor Olsen
Approach:
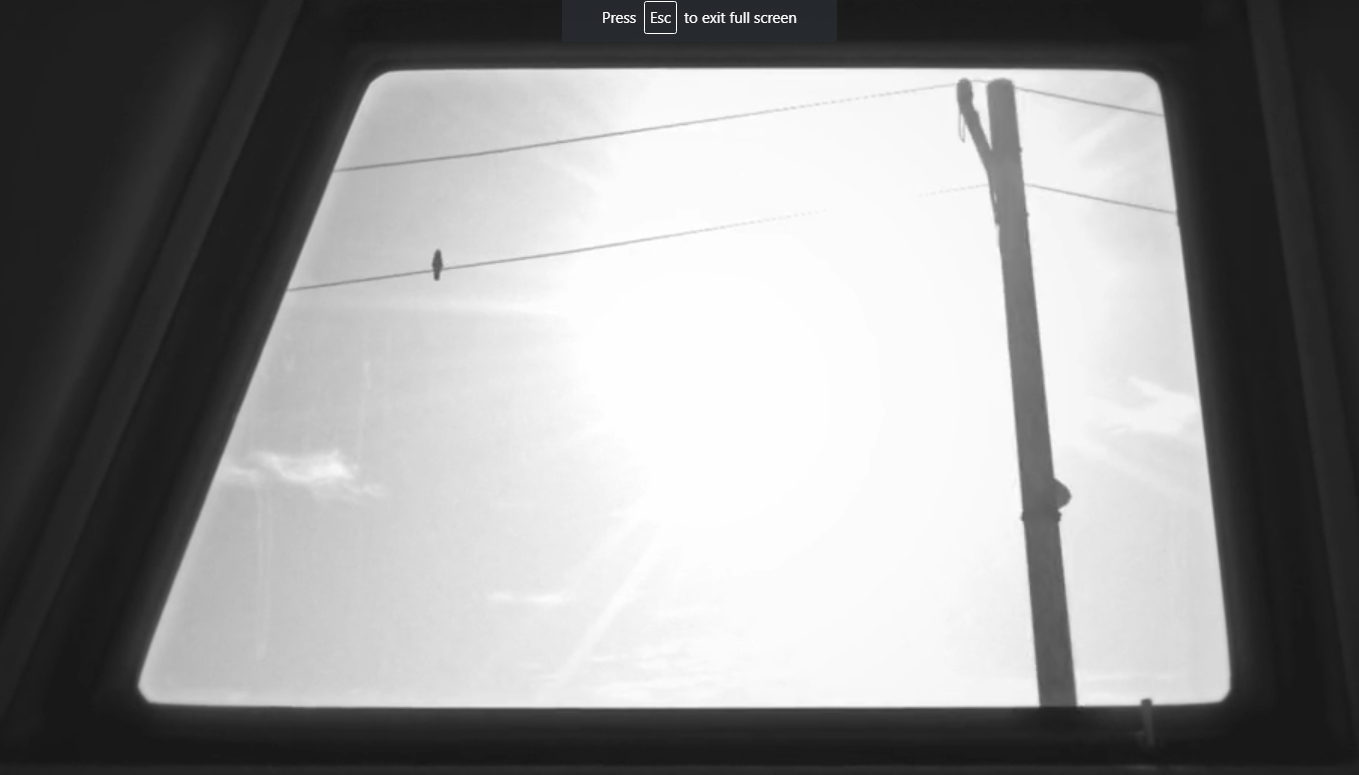
This week I presented the final short for the screening! I think that it went well, I appreciated the comments received from other professors and my peers. Mainly what I wanted to explore this week is making the minor edits to the short for the sake of realism, and nail down the sound and visual transitions near the beginning. I wanted to make a nice transition from the outside to the inside, and find a way to introduce the title text as well. I didn't want to name the piece after an aspect of light, but the feeling of waiting for the light to stop. In this case: "Cease". 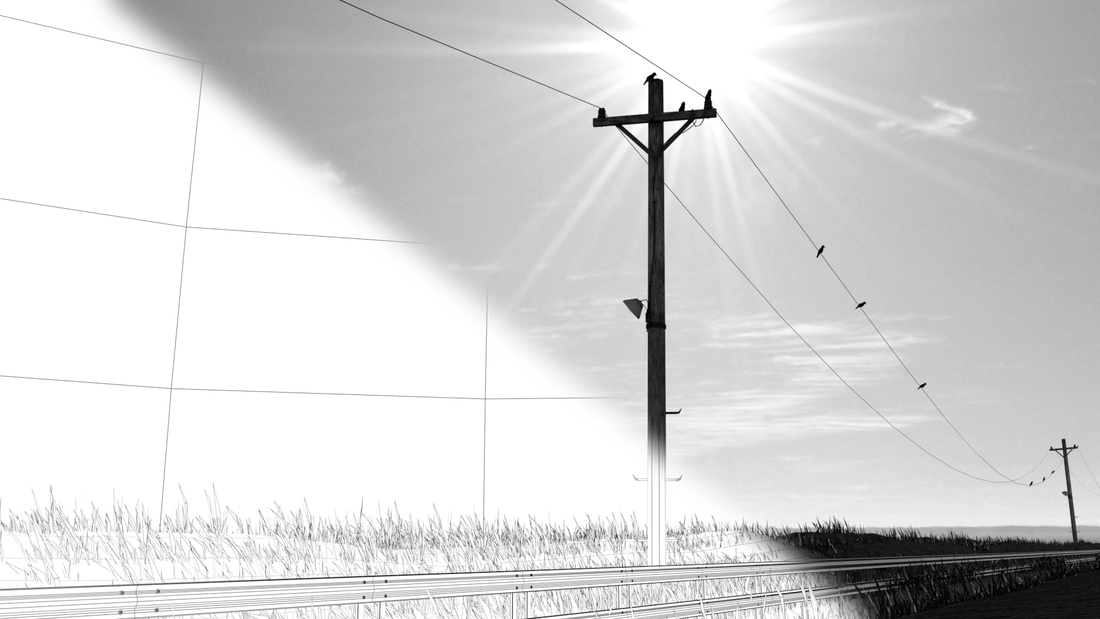
*A process shot showing the wire-frame vs. a final render.*
Choices Made:
For the final pieces of the scene, I went into post and added some effects that I thought were necessary. I first used a motion tracking effect on the window so I could either create an adjustment layer for the outside or inside of the window. I went onto doing some slight color grading on the inside to pull out the highlights and shadows a bit more. The render of the interior of the car appeared to darken the light that I had placed on the inside; though I think that this is attributed to the atmospheric fog I added to the lighting of the scene. Next step from masking the area, I added a slight grain, glow, and contrast adjustment to window mask. This made the poles really pop out against the grey-skied background and the shadows cast from the blocked sunlight. There is also a smudged window layer assigned as an overlay. It's very subtle, and might not be necessary, but I wanted to at least attempt the effect. For the last touch I added a slight silhouette and a blur to the outside edges of the screen.
Next steps: This week I'll re-watch my short and make some small edits that I've noticed through repeatedly viewing it. I know I want to change the introductory typography, and have the ending credits come up a while later after letting the screen fade to black. I had the feeling that I didn't give the audience enough time to realize for themselves that the short is complete (I jumped into the text too quickly). -Taylor Olsen
*Introductory lighting test for the short's creation.*
Approach:
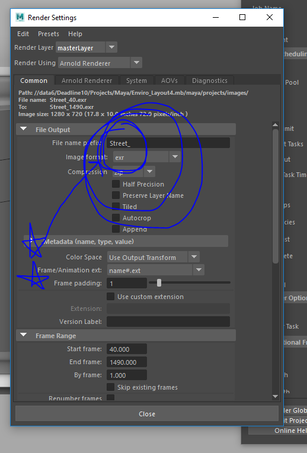
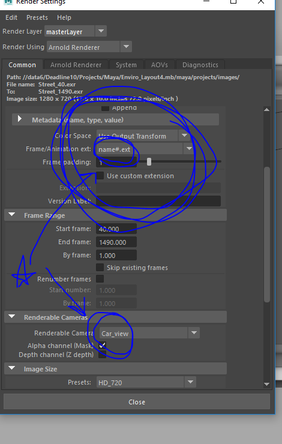
This week included creating a few different assets for the final short regarding the intro and some small embellishments to the Maya scene before I sent it off to render. My approach for the most part was making sure that everything fit together, my renders came out correctly (wow, I HATE rendering) and that my introduction fit into the scope of the project enough that it would transition smoothly. Above you can see the introduction; although it's about 25 sec. long, I'll end up cutting it about halfway through to make sure it doesn't drag on. Choices Made: I made my own choice, and mistake, to not give my rendered frames a prefix. UGH. So, as it would turn out my incremental saving was my partial downfall in the first round of renders. I had my scene names "EnviroLayout_4", BUT because I didn't put a set prefix, having the 4 at the end meant that every frame had a '4' in it's frame order, and all of them were incorrectly labeled and the animation sequence is basically unusable. Thankfully, the rendered frames look great and I was able to at least be happy with how they turned out. Now back to another 4 hours of rendering! Oh joy. Something to note: I found out that there is a similar command to consolidate files in After Effects; in Maya, going to File > Archive Scene will grab every file/texture/asset that's being used in the scene and put it all into one folder. EXTREMELY handy if you need to pass of your project to other people, I can't believe that I didn't know about this earlier.
*Don't make the same mistakes I did! Make sure to set your project, name your files, pick your cameras, and PUT A PREFIX!*
I also ended up going through and adding in some paint-effects in Maya for the grass on the side of the road. I wanted to have a little foliage for realism, and to cover up/fill any seams or "openings" that appear to be inadequately saturated with visuals. In addition to the foliage, I made the decision to also include birds on the power lines to give a little more discontinuity in the repetitive motion of the power lines.
*Time-lapse of the street creation. As well as small fixes to textures, and additional props for realism.*
For the sake of time as well in rendering, I decided that including the window in the frame and having to deal with transparency would make the render times shoot up. I'll include it in post later, since (thankfully) I decided to put the camera shake in post as well. I can create a mask in After Effects that will encompass the window, and play around with some transparency of a scratched/smudged window. While simultaneously using this mask as a template, I'm considering also adding in my own light leaks and playing with the grading of the grey-scale for the interior of the car, as there are a few areas that I'd like to be darker than they appear currently. I enjoy the blown-out look of the sun though, as it makes it feel more genuine in my opinion (since, generally, glancing at the sun tends to look over-exposed in any situation).

*A basic still from the short that I'll be compiling. No edits have been made to it yet.*
Inspirational Sources:
A trailer that inspired me (though I would love to see the film) is from a movie called "Roma". My professor initially suggested it to me and I hadn't gotten around to seeing it until this week. I really enjoy the wide panning shots that the director uses in the trailer, as well as the tracking shots and an intimate moment where it appears the main character is smiling at the camera. What's also very enjoyable in my opinion is that there isn't ANY narration in the trailer. I find it very effective the amount of wide shot's that are also incorporated, it gives a scope of the story at hand rather than arbitrary close-ups of faces and interactions.
*Netflix trailer for "Roma".*
Questions Raised & Needs:
Next steps: This coming week will including compiling my shots together (once the render finishes again), and doing some post work for making it look even more appealing than I already find it. I will also have to determine how I want the melody of sounds to work in the piece, as the Max/MSP patch that I created isn't capable of outputting a sound file that is read-able. I'm excited to see how it all works out in the end as I feel like I've made good use of my time, and pushed the scope of the project up towards the edge of what I can handle. In the end, this makes me realize how my productivity should be about finding more solutions that make me "work smarter, not harder". -Taylor Olsen
*Playblast of the environment from the interior view of the car.*
Approach:
During the week I began working with my cameras in the Maya scene for the pacing of the utility poles and adjustments for the lighting. I went back and referenced my light layout and had to add a few more for the sake of making certain small areas visible; such as the inside of the car and the small lock on the door. I also began putting together a refined storyboard in Photoshop and assembled in Premiere. It's very basic, but in my opinion necessary for understanding how the pacing of the short will feel. I also made a play blast of the scene with the camera in the car window. Choices Made: I chose to make the window section of the car just a small diorama with holes on both sides of the enclosure. I'm using a sky-Dome light in Maya for a natural look on the utility poles and the outside environment. I decided to include some extra lights where the sun spot is visible, and use them for the atmospheric-fog in the light. My main goal was to make sure that when a utility pole passed in front of the light, we can see the light bend around the edges of the pole, as well as see the shadows visibly cast from the light of the sunshine. I'm not sure how I'll end up lighting the lock on the window, it has proven to be difficult. I think that I'll perhaps have to do a separate render pass and layer it on top of the other for the sake of making sure the lock is lit (and we can see the shadow move indicating the passage of time).
*Rough animatic of the short.*
Inspirational Sources:
Although it doesn't resemble the style that I am looking to create, I do appreciate all of the visual aesthetic it has to offer. The animation is done by "Cossa", and they remind me of Roy Lichtenstein. It has this pop art representation, while the color palette is muted but chosen carefully. It's only a green, red, blue, white/black throughout. I really enjoy the way that they executed transitions and other camera tricks. There is a point with cards on the table that become 3D. The camera dives down deep into one like a tunnel and the effect is extremely satisfying to watch. I'd like to utilize some inspiration based on the transitions and maybe utilize them in my short. Stephanie Richards — Gong from Pomp&Clout on Vimeo.
Questions Raised & Needs:
Next steps: Next week I'll be working more with finishing up the edges of the road to make them seem more realistic than they are right now. At the moment it just a solid plane. I'd like to add some bushes, trees, stones, something to cover up what's there now. I also would like to consider using image planes rather than actual objects. I'll also consider using a normal map for the side of the road, it will probably need to be tile-able. -Taylor Olsen 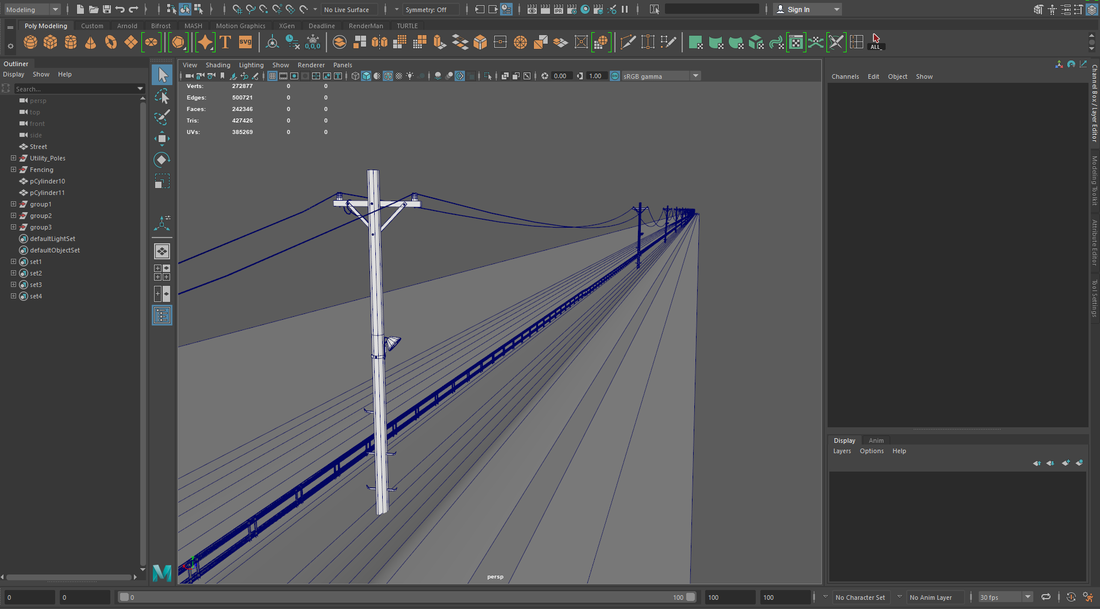
*Screen-shot of the Street view from the creation of the scene.*
Approach:
This week included finding visual references for the short, creating some basic look development photos, recording our own voices based on the memory we chose, and writing a technical description of how we would go about making the final experience. This week was more about creating the assets for the short to prepare for texturing and rendering, more will be explained further in this post. For reference, here is the poem chosen (I made small alterations during my recording session): "Telephone poles punctured the sky like cracks on pavement. I was still, but the world moved around me. Each passing line ticked in my brain like a metronome. [Soft humming in the background] Melodies danced around my head to the beat of the shadows, killing time and creating memories. Eyes closed, my mind waited for the pattern to halt." Choices Made: As for the visual references, the images themselves needed to have a sound reason behind their comparison to the experience. Such relationships included (from the assignment brief): "why chosen, relationship to your memory, type of lighting, technical description of lighting position, quality and approach and lighting diagram of top and front placement for each reference image." I decided to search for images that weren't necessarily influenced by lighting, but showed the mood of the short. I picked the utility pole because of the harsh contrast, and the divided street barrier for the repetitive pattern that would ultimately influence how the scene is created. (See Below...#1 is the pole - #2 is the barriers)
*The imagery.* *The diagrams for the respective image.*
For the technical understanding and explanation, I decided that I would stick with the programs that I had familiarity with, but would explore more with Max/MSP/Jitter for the audio output and final influence on the short. I want to experiment with Nuke as well, a compositing software that can add in effects to 3D-scenes that make the whole shot look either more realistic or stylized. From my own submission:
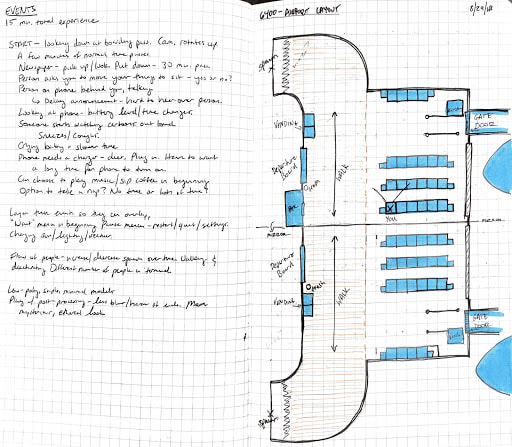
"The utilization of Maya will be for creating the backgrounds that will eventually be rendered into a full scene. Foliage will be necessary in order to create the illusion of depth in the scene—I might consider using flat imagery though to still create the same effect as what would be seen from a side angle (should also consider the fact that the camera will be moving very quickly, and won’t necessarily have time to ‘dawdle’ on the imagery presented)... Max/MSP/Jitter will be used as an experimental aspect of the short. It will have the video fed into the program and output sound based on what is seen—I’m thinking that this will be where most of my learning for this project comes from, as I am comfortable using the other programs for obtaining a desired effect. Photoshop/Illustrator will be used (as mentioned) to possibly create some flat imagery that will move slowly (parallax effect) in the background behind the 3D footage." When recording, I made many different attempts to capture what my voice actually sounds like in a relaxed setting. Most times, I think my voice sounds very "forced" in my approach, so reeling back and taking more chances to hear what I sound like and re-recording helped with feeling confident in how it sounded for editing later. (See Below for the actual technical layout, the layout of the imagery and scene lighting, and first-pass edit of my recording.)
I honestly overlooked the part of the brief that mentioned to create development images/a storyboard that captured the ideas that I had in mind. I took influence from the repetitive lines as a beginning point. Below you can find a very bare-bones storyboard that includes how I want the short to begin. It starts with a fade from black, eventually "scan-lines" appear on the screen, giving little hints that something is moving in the background. Below is the board: 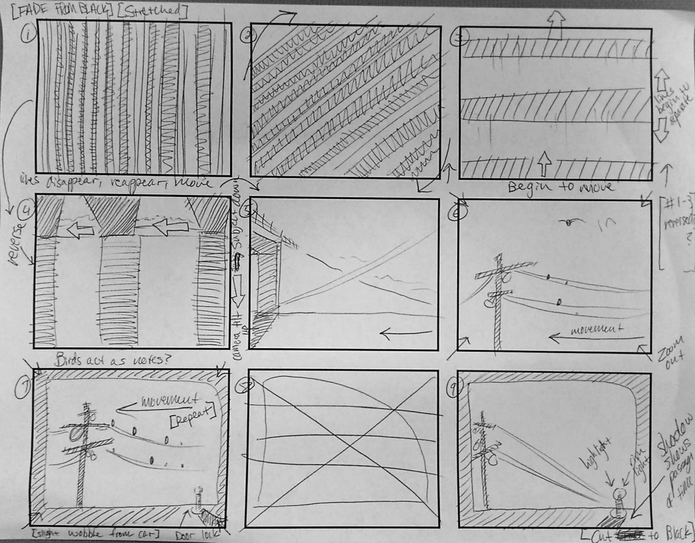
*Bare-bones storyboard.*
As the short begins, the scene reveals itself as the camera trucks backward to reveal the window as seen from the first-person POV. Something I wanted to consider for the passage of time is the lock on the door of the window. While the light source moves through the horizon, I've considered either the shadow of the lock moving from left to right, or having the shadow increase in length as it is pushed closer towards the camera. If I choose the option for the shadow to increase in length, it will only be effective until a certain point. choosing the movement of the shadows from right to left will be more effective (in my opinion) in showing a passage of time, though this piece isn't necessarily concerned with showcasing the lock (it's just something to add character to the scene).
During the creation of the scene, I considered having my scene on a single loop for the utility poles section, but this would lead to even spacing between the images and would make it feel too "perfect" in my opinion. So, I instead created each pole, duplicated them with even spacing, then went back through and rotated/tilted each one slightly and changed the spacing between them to make the scene feel a little more realistic in its execution. After creating the poles, I started with a basic guard rail for the siding of the road for added realism to the scene. I then went through and created the power lines connecting each pole (it might have made more sense to do this post, but it was fun making each line a different height in the end). (Below is a time-lapse of the creation of the street/highway)
*Environment time-lapse*
Inspirational Sources:
I didn't have much for inspirational sources this week, other than exploring more imagery that would influence how the light would be depicted in the short. Below, you can see an image of a render someone made using light--I would like to mimic this effect of having it pool in through the edges during the begging of the short. It almost looks blinding, seemingly like the area behind it is mysterious and possibly endless. I'd also like to point out how the particles affect the overall mood of the image, it makes the scene look more dormant and still. I won't be using the same effect, but I have considered making the window of my scene a little clouded as to give some character to the window the audience will be looking out of. 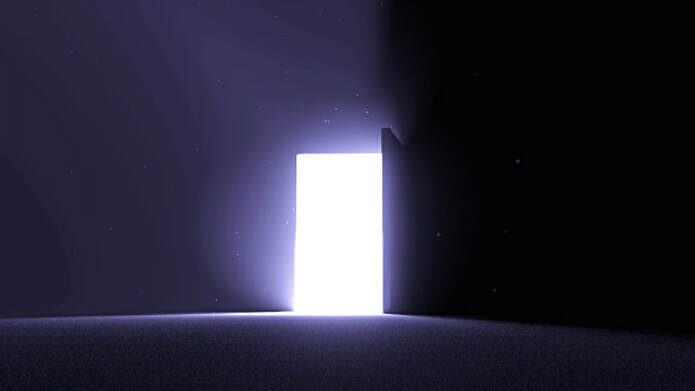
*Reference imagery that will influence how I want my own light sources to "pool" into the scene.*
Questions Raised & Needs:
For the following week, I'll be refining my storyboards and putting them into Photoshop. I'll also begin creating an animatic for the timing of the short, and go back and perhaps add some spacing between my audio to make it more dramatic and give visuals more time to reveal themselves; rather than having a very short mid-section, and having too much time spent on the beginning and end of the experience. I'll be making use of my initial layouts to also create a lighting / cinematography and timing sheet (as well as camera setup) for future drafts that will aid towards the final renders. -Taylor Olsen 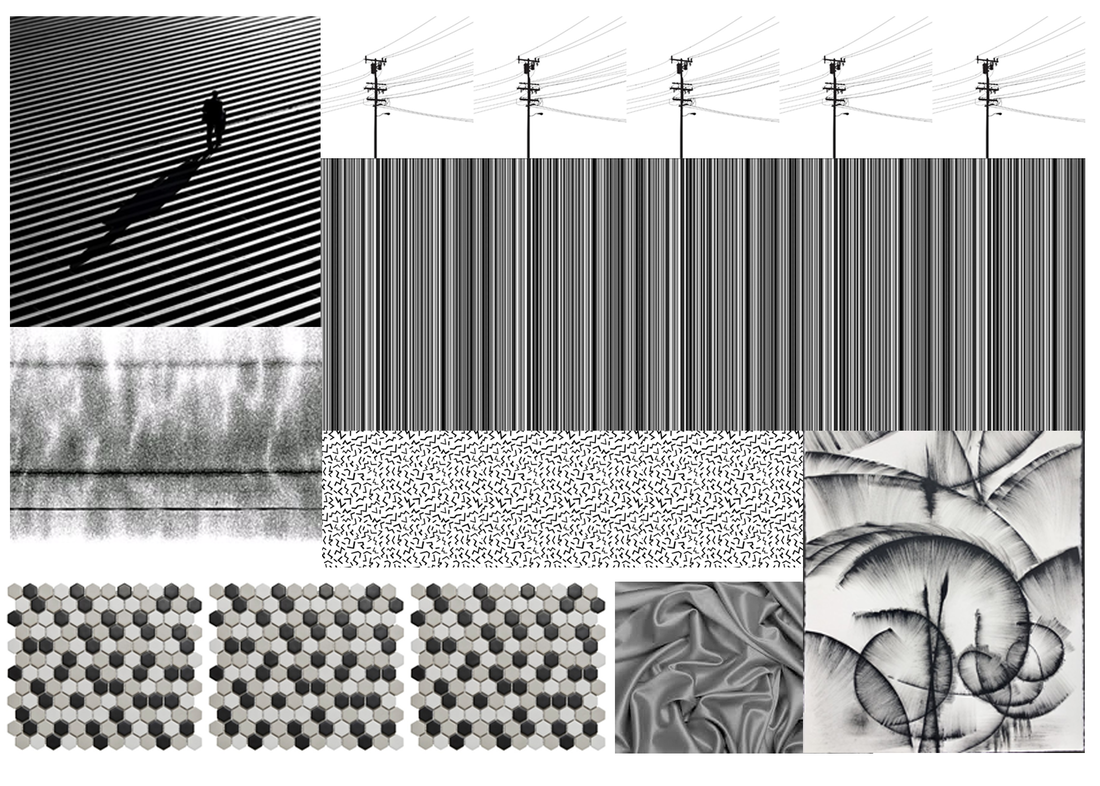
*An exploration of visuals based on the chosen poem from the assignment brief.*
Approach:
From the assignment brief: "Often we recall a memory moment, because there is a particular sound, time of day, season or smell associated with that memory. Memory moments are brief but descriptive moments we viscerally remember from our person experiences when reminiscent conditions trigger the memory or experience." For this 4-week design project the goal of the assignment is to recall a significant memory in which lighting drives what the memory holds. It will eventually be a 15-second experience in which the viewer notices and comments upon what they have seen. To begin, we created a series of 3 instances in which we thought lighting was pertinent to the memory at hand. "The foundation for the project will emerge from your willingness to engage in visualizing experience, with the purpose of building a vocabulary for describing them and improve your skills and technical knowledge in storytelling of experiences." Choices Made: Initially, I couldn't think of stories that had much to deal with lighting, as most of my memories come from what actions I was doing rather than how they would be remembered through lighting. Thinking further, though, I realize that most memories that I have did include lighting based on the location regardless. It's just something I thought less about as I recalled the instances. My initial choice was to remember moments that weren't necessarily about light, but the synthesis of light and shadow. I recalled moments where I was still, and not necessarily moving. The three stories are as follows: #1 - "I've never felt closer to the earth while holding her sun-dressed hand in Tokyo, Japan. The lustered beams of quilted light hazing from the amber peaks of the skyscrapers dissipated all sense of location and self. Spiraling through the overwhelmingly surreal traffic together in the first moments, lost and disconnected among the endless reflections, I felt free for the first time in my life." #2 - "Telephone poles punctured the sky like cracks on pavement. I was still, but the world moved around me. Each passing line ticked in my brain like a metronome. [Soft humming in the background] Melodies danced around my head to the beat of the shadows, killing time and creating memories. Eyes closed, my mind waited for the pattern to halt." #3 - "Feeling wholehearted from the fire outside in the cold white frost, I only see the teeth of my friends as we laugh about nothing. Necks arched, we blow out plumes of contentment. We cloud the stars above while our faces mixed with the embers. Later, as I find myself alone, a tear drops near the fire. It was pure darkness, the dancing swirls had no effect, a shadow paled in comparison - but that drop still burns brighter than any morning sun." Out of the stories told, I eventually ended up with using my second one. The inspiration for the story comes from many car rides in the back seat of my parents car. I usually despised the music they would play, and would put in earplugs so that I didn't have to listen. The rides would last for a few hours, usually from going to my relatives hometown in the middle of nowhere. This would make our trips there and back usually in the morning/evening when the sun was rising/setting. All of the light would shower into the car and onto my face, and I would wait for the movement of the light poles to stop. By the time they would, it meant we were arriving/departing our destinations. Inspirational Sources: Because of my previous projects using Max/Msp/Jitter, I want to incorporate sounds into the experience that is directly affected by the visuals. I'm considering utilizing repetition as the basis for this short to influence the light, and making it longer so that ​I have some room for exploration with music. An inspiration that I have for this video is something from an Instagram post from an Animator (Ezequiel Torres) - rudoplayer1 on Instragram:
I really enjoy this short tidbit of music and visuals paired together. How he synced up the movement of the lines going across the screen as the beat of the separate parts of the track begin is visually and experientally pleasing to watch. I always find it interesting that more animation schools don't teach foundations of learning how to use sound. For people who are not deaf/blind, it would seem as an invaluable resource to have as they have more use for visual/spatial/audible exploration.
Questions Raised & Needs:
Next week, I'll begin with recording my voice for the narration of the short story. I'll also explore more Msp usage in the short, and consider creating my own soundtrack for the project. I want to also look online for free 3D assets if it will save me time with creating the visuals by hand. Lastly, I'll have to decide if I want to use traditionally drawn animation, as that will be the most time consuming in the long run, but in my opinion will give the project more character. -Taylor Olsen 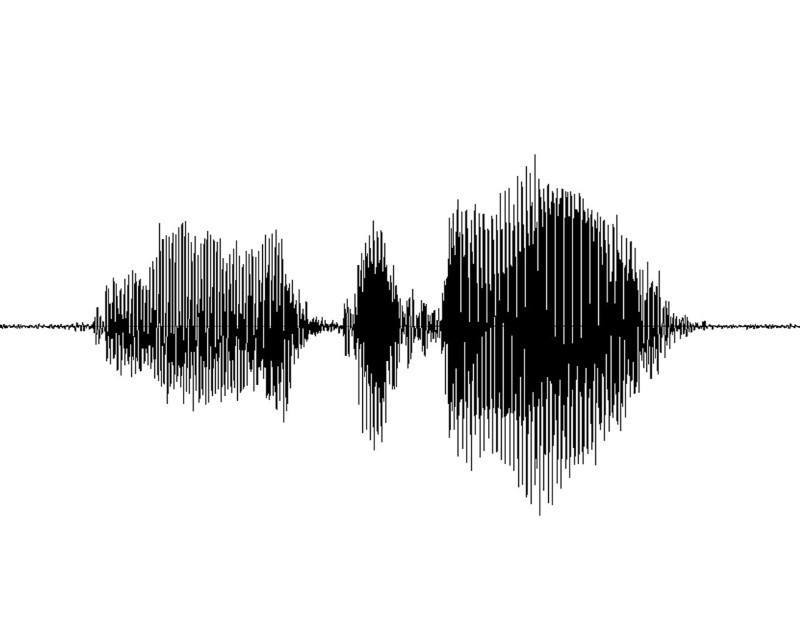
Approach & Proposal:
We’re used to seeing music visualizers and how sound is translated into imagery. And while music visualizers are visually impressive, I am interested in reversing the process of translating music into visuals. So, I began to explore the visuals creating the sound, rather than the sound making visuals. Link to original proposal: 6400 - 10wk Proposal Link to final presentation: 6400 - 10wk Presentation
Choices Made:
Part of the interest in pursuing this idea came from animation theorist Paul Wells: "Experimental animation has a strong relationship to music and, indeed, it may be suggested that if music could be visualized it would look like colors and shapes moving through time with differing rhythms, movements and speeds...Sound is important in any animated film, but has particular resonance in the experimental film, as it is often resisting dialogue, the cliche sound effects of the cartoon, or the easy emotive-ness of certain kinds of sounds.” - Paul Wells Working with looping animations as well as non-objective forms was the best way to determine how sound would be affected in the final program output. I found a few references online on how past animators such as Norman McLaren would create sounds in his animations.
*Loops created as part of an older project.*
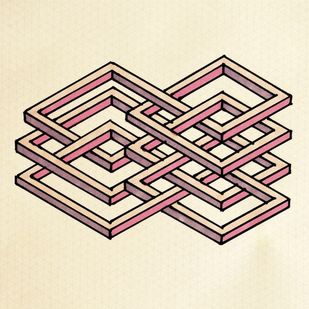
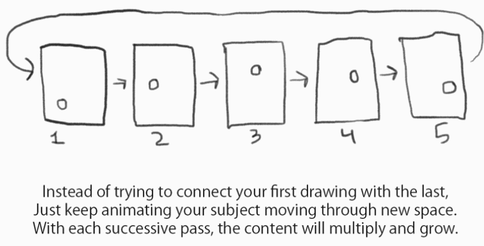
*Below is examples provided from Caleb Wood, the creator of the concept of "Weaving Loops"*
Link: Weaving Loops 
I found that having control of the animation, I could essentially control rhythms, beats, colors and transparency dictating sounds, etc. Paul wells went on to say,
“[Abstract] Experimental animation either redefines ‘the body’ or resists using it as an illustrative image. Abstract films are more concerned with rhythm and movement in their own right as opposed to the rhythm and movement of a particular character.” Paul Wells then quotes another animator and theorist [William Moritz], “Non-Objective animation is without doubt the purest and most difficult form of animation...inventing interesting forms, shapes and colours, creating new, imaginative and expressive motions…”
When Norman McLaren drew the sounds on the film, I thought that I had already been beat to the punch; but what I learned from McLaren is that he merely drew the sounds, but didn't use them as a visual in his animation. --My process wanted to take an animation and analyze it real-time, and output sound variables based on size, position, color, shape, elongation, etc. This would include testing some different methods of creating these visuals.
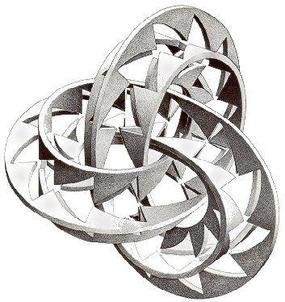
Another method explored is from a man who goes by Jerobeam Fenderson. He utilizes Oscilloscopes to create the visuals for his music, but not necessarily in a true way that "what you see is what you hear". He creates the lines out of sound waves, and manipulates them to create the shapes, then software to multiply and change the beats.
What Jerobeam does is utilize the sound from the oscillator to create the lines and dots, and eventually imagery in his animation. The sound is already being produced. So, what we hear is what we see in his videos. I was interested in a process that is reverse of what Jerobeam does. This included taking the animations, and have sound outputted from what motion or imagery is seen. What we see is what we hear.
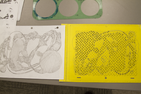
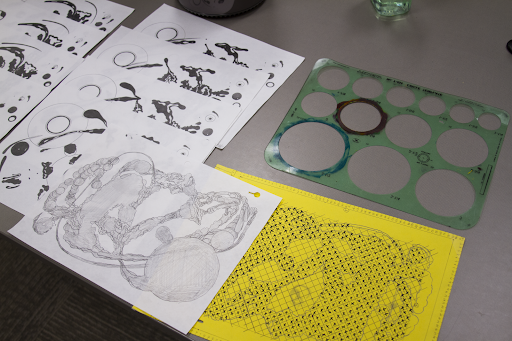
Initially I ended up working on some looping animations for one of my old classes, and eventually decided to move to a physical medium to see how this affected the process of creating them.
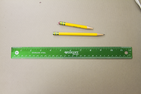
*Stencils, rulers, paper, and Ticonderoga 2B pencils.*
*Influenced by Adam Beckett, Ori Toor, and Caleb Wood.*
*What would this sound like if each shape's movement made it's own sound?*
- 12-frame hand-drawn "weaving" loop -
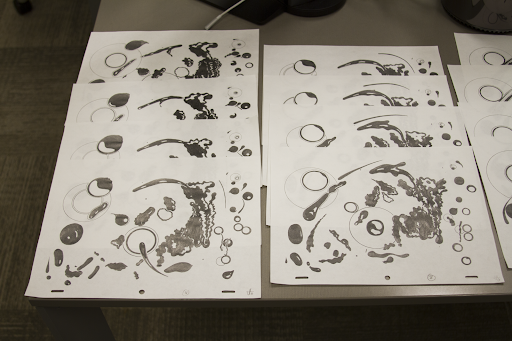
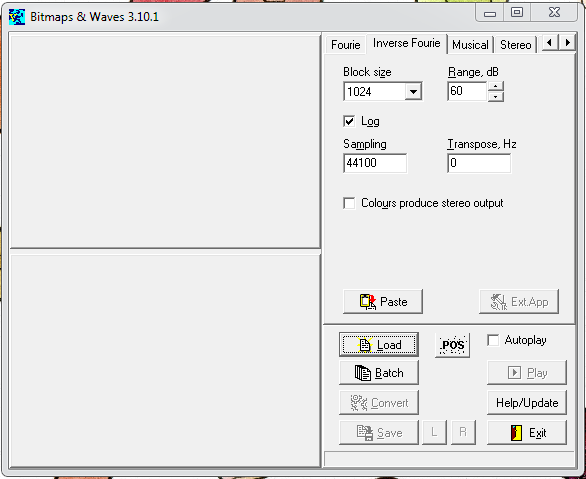
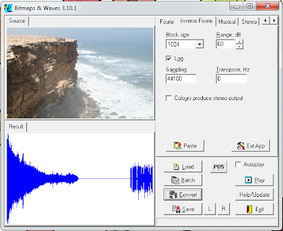
Next after doing some digging online, I found an individual named Victor Khashchanskiy that made software to scans images and translate the photo into sound. I would eventually end up plugging in each image respectively to gain an audio track.
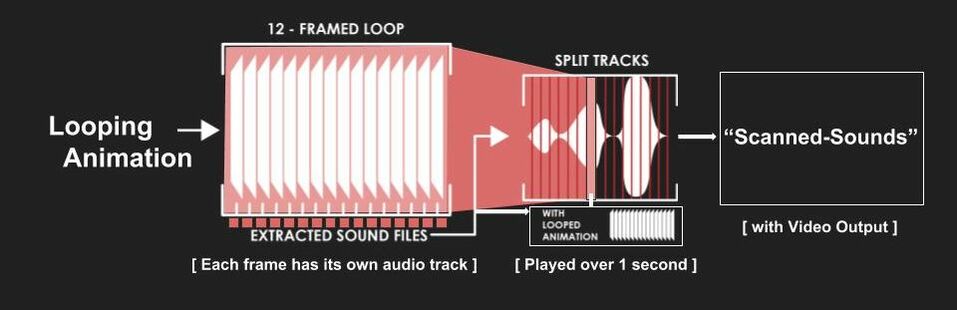
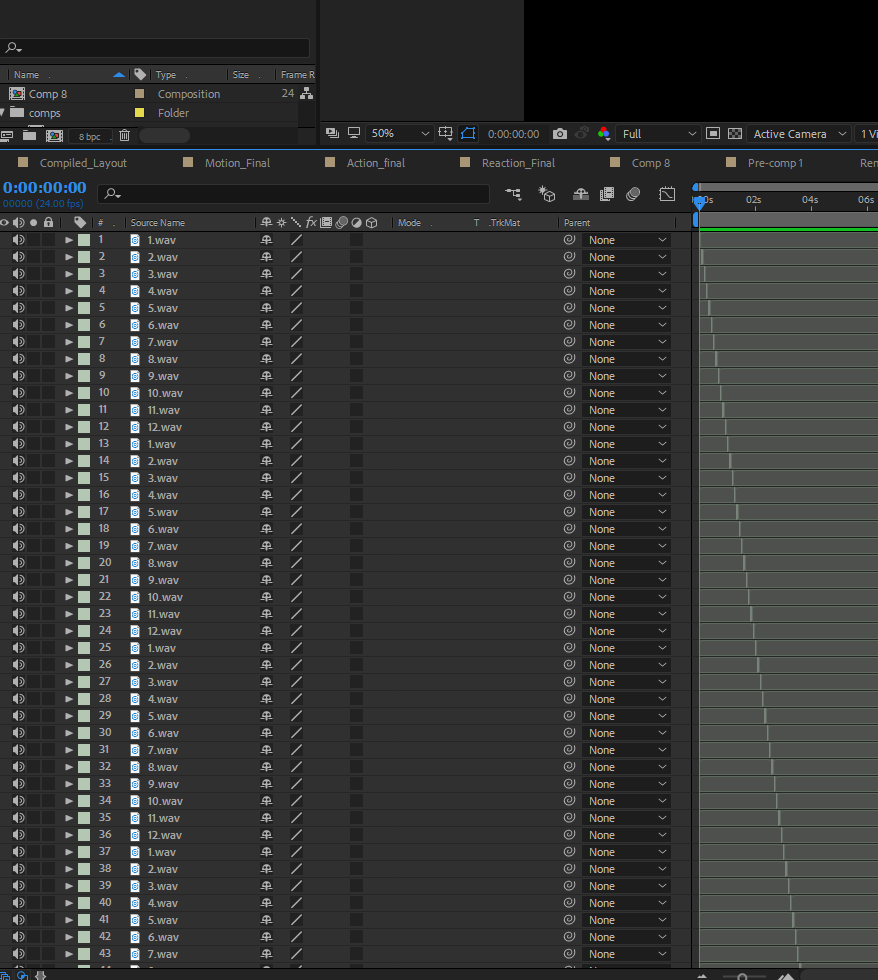
As shown above, I planned on taking the animation from the loop and plugging it into the software. After obtaining a track for each image, I went into After Effects and split up the sounds into separated 2-frame playbacks that cycled through each visuals "track" (1 through 12) and repeated as necessary. The process of splitting up the tracks was the most time consuming, but eventually as I copy/pasted and used AE shortcuts it only took about 5 min. Below you can find an example of how this worked.
After fidgeting with how to represent the layout of the sounds, I found out that the software only captured a small section of the actual image. I could have had it scan the entire image, but that would have resulted in a 5-7min track that I would have had to split up even more than necessary for this exploitative process. I find it peculiar that it also scanned from the bottom to the top of the image, when assumedely it should scan from left to right. I had to make a few changes to represent it correctly, the final product is below:
information about 12 principles process...TBC
Final layout...TBC
max/msp/jitter example...TBC
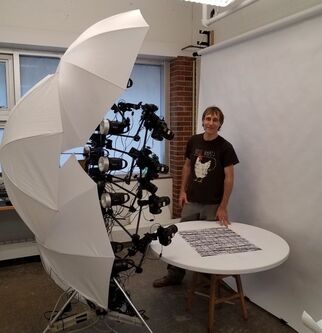
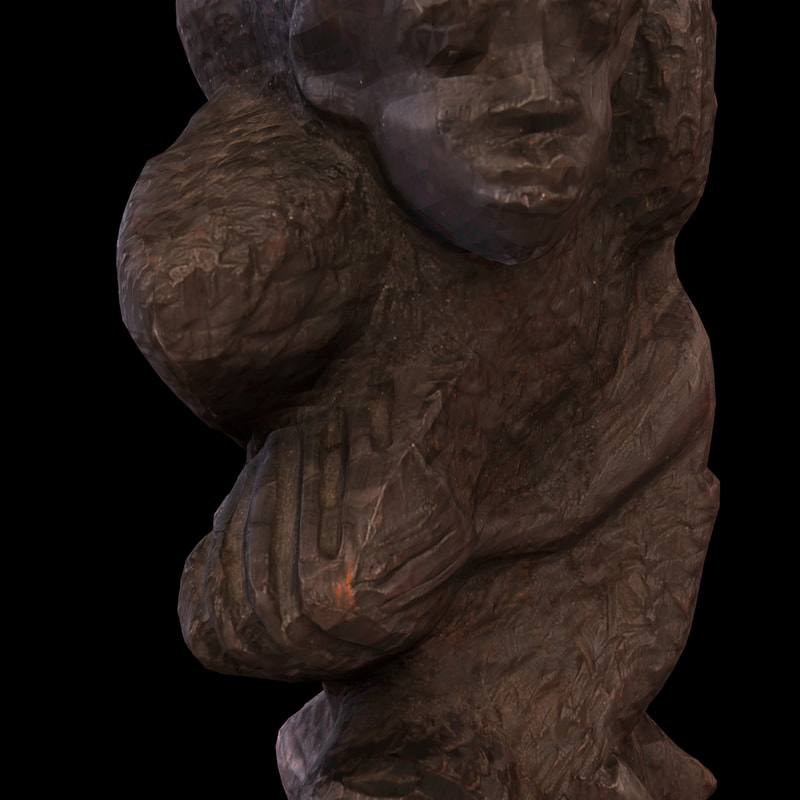
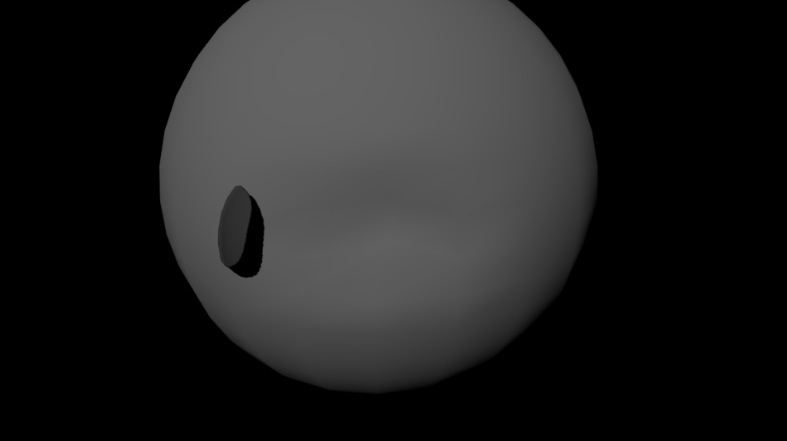
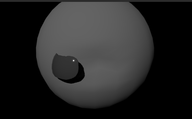
This project dealt with picking an object to be digitized into a 3D model. To begin, numerous tests of different objects were attempted to understand the complexity of photographing a model in a specific lighting situation that would produce optimal results. This in turn ended with working with Andrew Frueh in the department of art and his photogrammetry setup. Part of the emphasis of this project was to also lower the amount of polygons in the resulting model, lower the image resolution, and create a stable and easily loaded model.
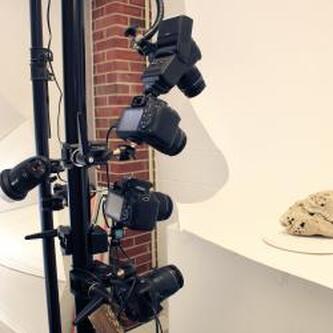
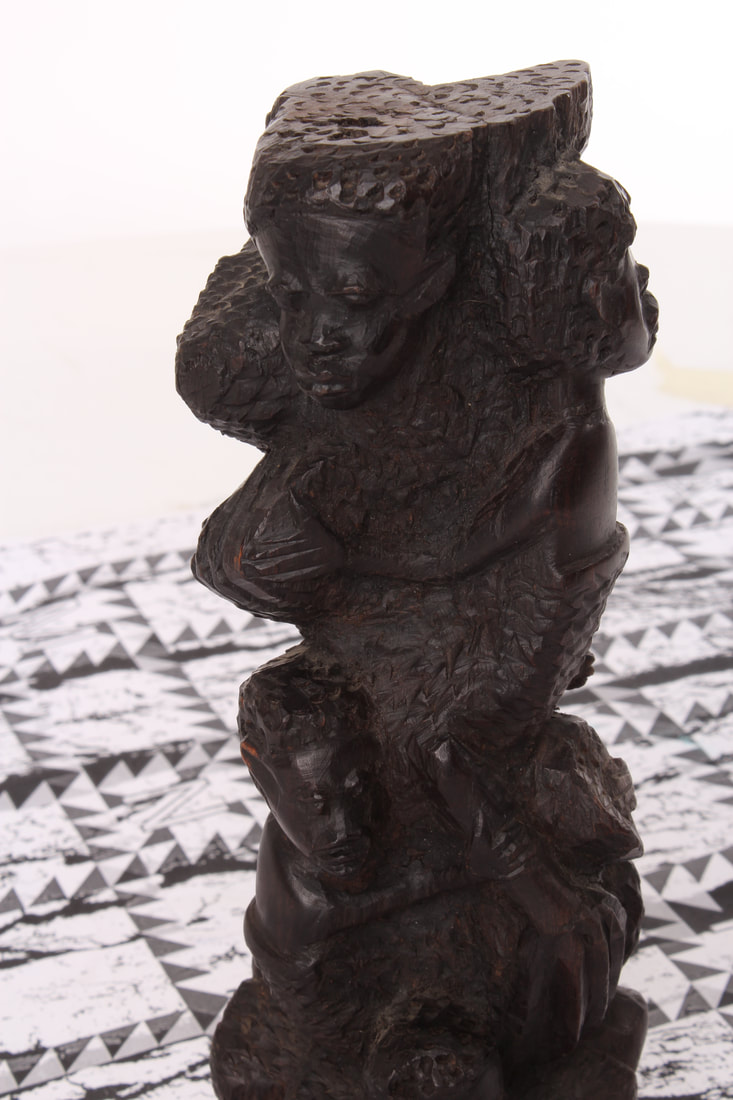
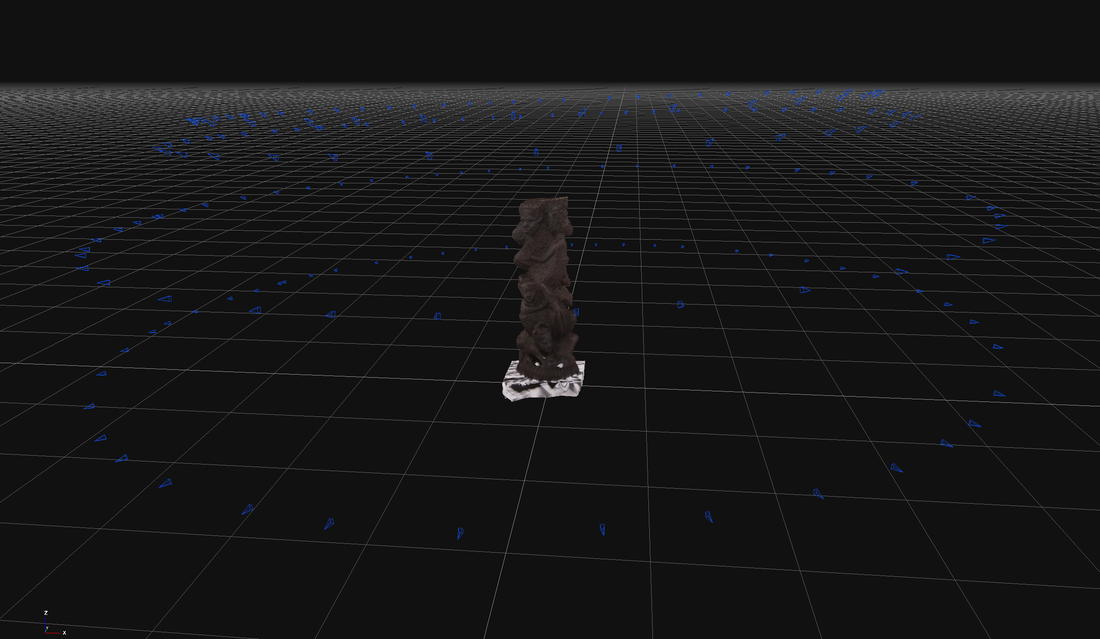
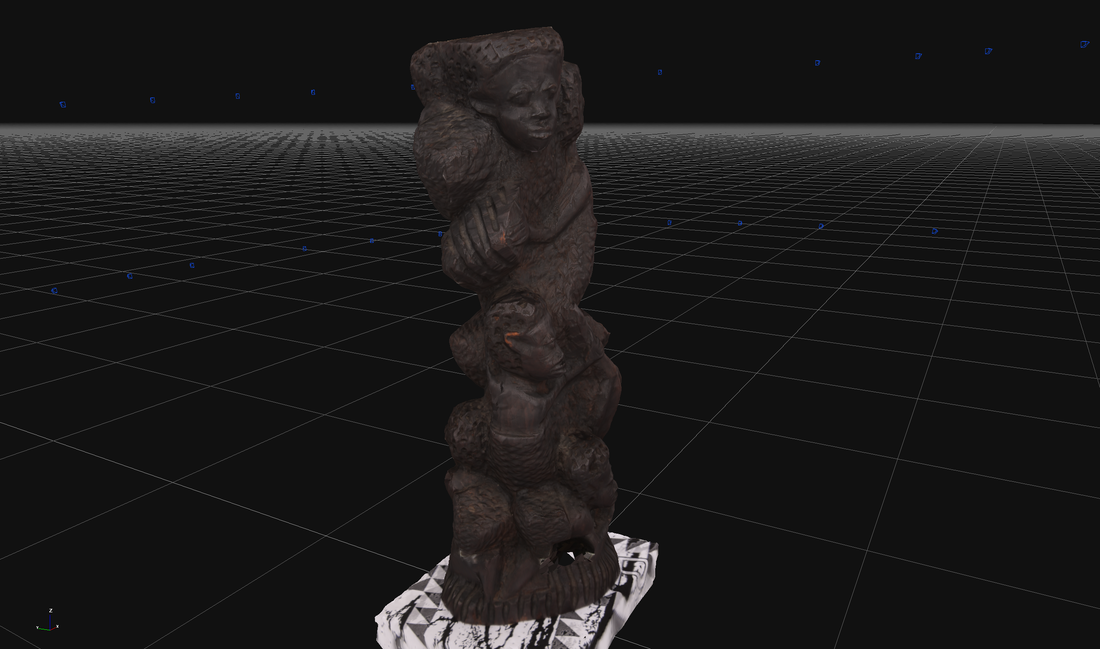
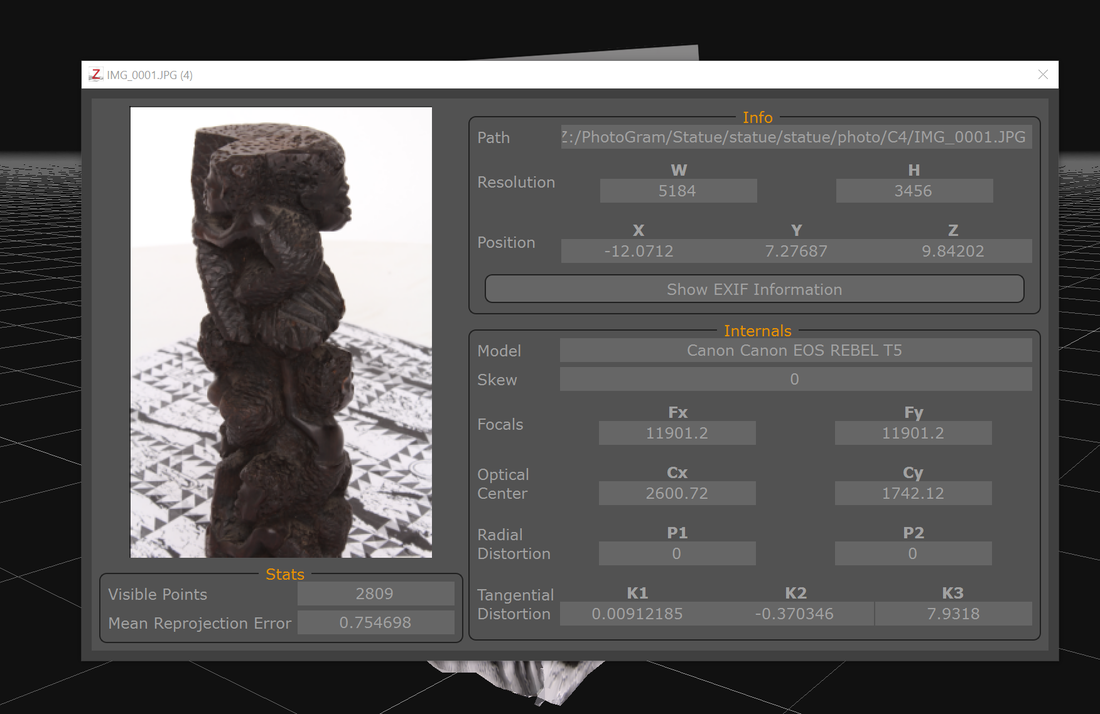
Andrew Frueh and his setup in the department of Art @ OSU (Images from OSU) The object that I decided/attempted to digitize was an antique statue from an African-based tribe. The statue itself had many crevices and holes to attempt to capture, as well as specular highlights and minute textures. The process of generating a stable amount of photos includes having a proper background and foreground, allowing the software to denote 'markers' within the space to generate a solid 3D model for later manipulation. Images of the statue at different angles -- captured from the setup. *Click to enlarge* Above you can see the setup of where the object was stationed. We would place them down and take photos (in multiples of 6), for a single 6-10 degree rotation. The different heights allowed all of the cameras to capture different angles of the object itself. The total amount of photos taken in about 2-3 minutes was 300. Things to note:
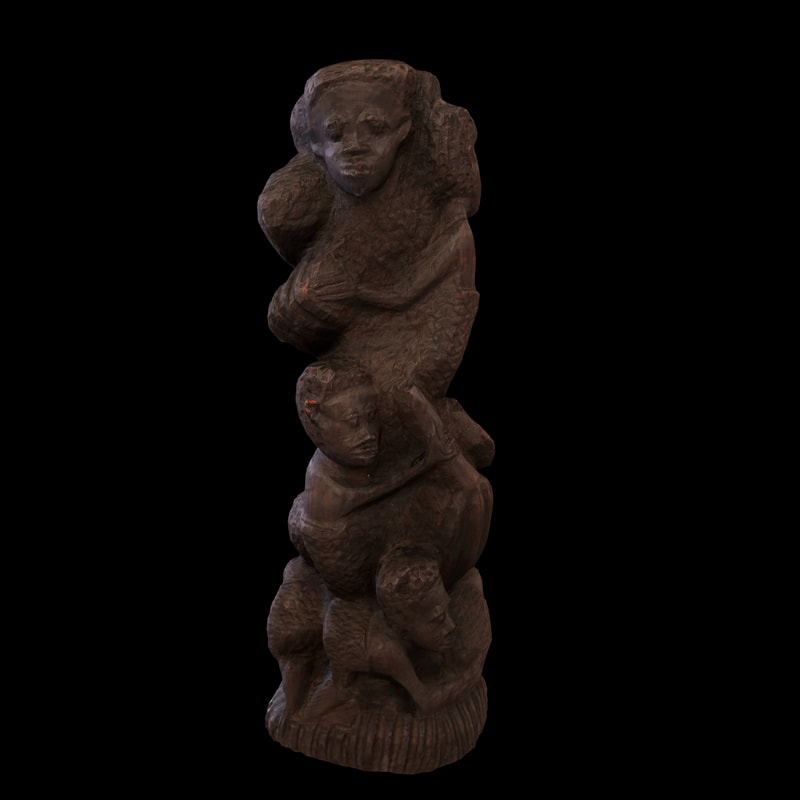
Zephyr software reconstructing the photographs in 3D. *Click to enlarge.* Above you can see the images being shown in Zephyr. In the first photo is a representation of the different cameras with the 360 degree coverage. Here you can see the circular representation of the false camera position based on the position of the object. The second is a closer image of the actual object in the space; the last is a live photo of the object that was digitized. Notice how the white background was completely exempt from compilation of the model. 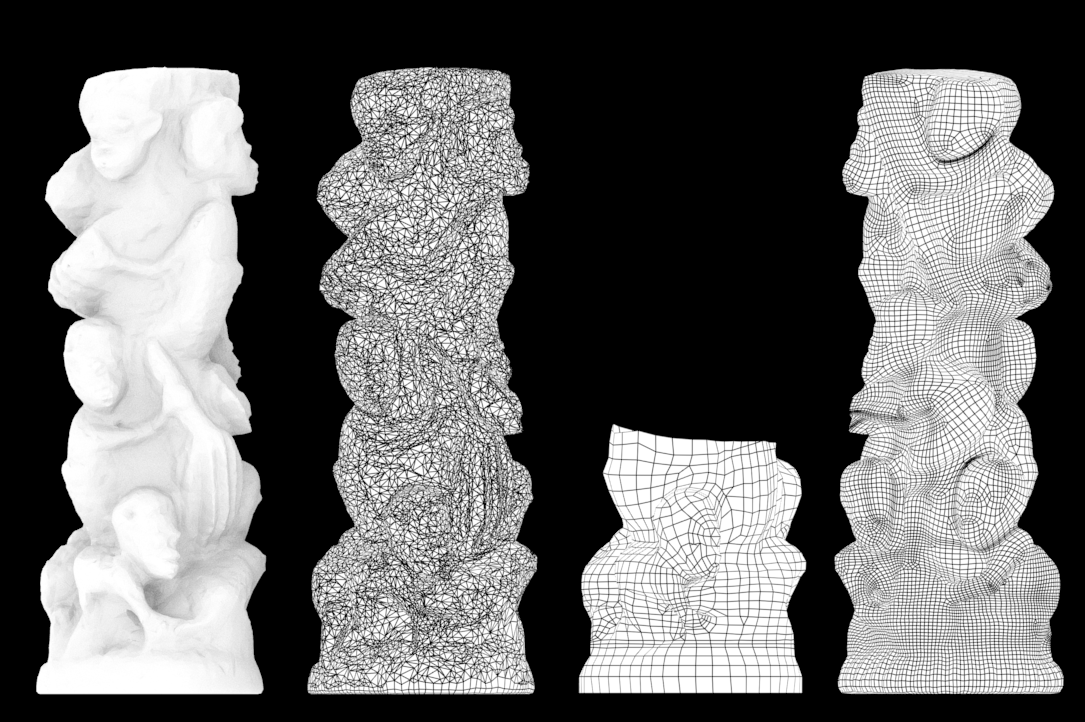 1 - Base statue || 2 - Base geometry of statue || 3 - WIP of statue retopology || 4 - Retopology of state After exporting the base geometry model from Zephyr, the model has a good amount of fragmenting from the dense cloud-points. I used the quad-draw feature in Maya to create the new topology from scratch, because at the moment of using Mudbox 2018 there were some retopology issues that couldn't be fixed. This was partially because of the small holes in the statue itself, along with the complex model of the statue in the first place. I unfortunately made a mistake after retopologizing my model by sending it over to Mudbox and accidentally overwriting my work with a higher resolution in the poly count. I'm sure it's noticable to see the difference in the amount of polys in the quad-draw vs. the final output. But, something to remember for next time! (always have back-up saves) Process video of retopology breakdown. After retopologizing in Maya, I sent the model over to Mudbox to adjust and add in detail to the Normal, bump, and diffuse maps. This included using different tools like the clone stamp, a subtractive wax brush, and switching between the layers as necessary to make sure everything was lined up correctly. Using the option of the 'tone-mapper' view in Mudbox, I was able to see all of the darker areas of the model--making it easier to fix/fill those areas as needed. Some render shots of the final output. *Click image to enlarge* While the render itself is much lighter in hue than the actual statue, I believe this is part of the ability of being able to digitize the textures. Having the freedom to change how the statue looks and perhaps *improve* upon what is initially visible is in my opinion, a viable way to capture an object. It's still unfortunate that I lost the low-res base that I had created, otherwise it would have been 5k in the poly count--rather than 20k. I can always go back into Mudbox and retopo it as necessary; there's a function to set out specific curves for the program to recognize to at least make it clean. Regardless, below is a turn-around of the statue and a comparison of the wire-frame. Enjoy! 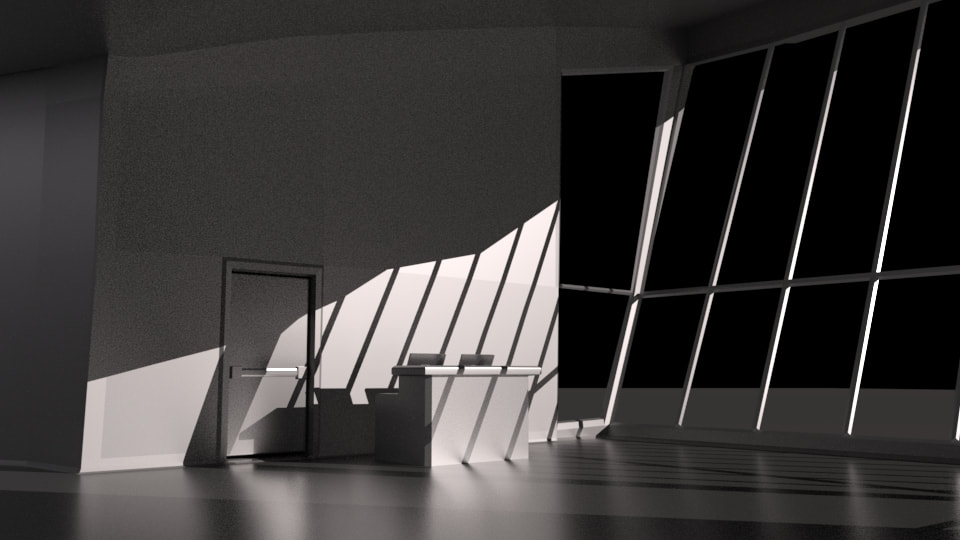
"How can we represent liminality in such a way that the participant understands they are experiencing a shift in the flow of time?"
Approach:
The initial approach for this project was for our group of people to create a VR-experience that encapsulated one of timelessness and placelessness. Our group composed of (Abby A, Leah C, Sara H., Taylor Olsen) proposal was about the participant that becomes an observer of the temporal and spatial displacement intrinsic to "liminal" spaces. We began with our basic layout of how we were going to approach the project as follows:
Choices Made: For Ideation, our group began with basic reference photography for the layout of our assets. Sara also contributed personal accounts of her more recent travel experiences.
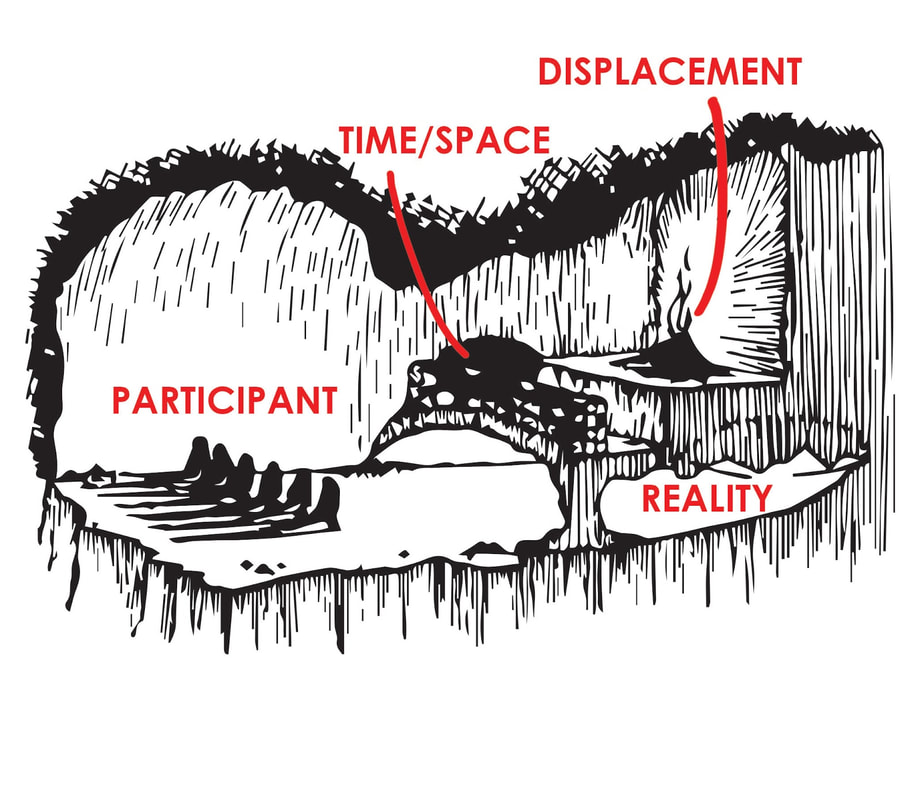
*Left: Representation of Plato's allegory. Right: Original notes/sketch from Abby Ayers.*
We utilized Plato's "Allegory of the Cave" as a explanation to part of our reasoning behind the limited control in the final experience. How we broke down the image above is as follows (in relation to the original: [en.wikipedia.org/wiki/Allegory_of_the_Cave]).
Our Interpretation: The (Airport) represents the (Virtual) world for the (Player). The (delays) that prevent the (player) from leaving the (Airport) represent (timelessness), meaning the (Delays) are stopping them from (progressing towards their destination). The (disappearing/reappearing objects shown) in the (space) of the (airport) represent (temporal shifts), which is an illusion that the (players) see in the (airport). Actual: “The cave represents the superficial world for the prisoners. The chains that prevent the prisoners from leaving the cave represent ignorance, meaning the chains are stopping them from learning the truth. The shadows cast on the walls of the cave represent the superficial truth, which is an illusion that the prisoners see in the cave.”
Development:
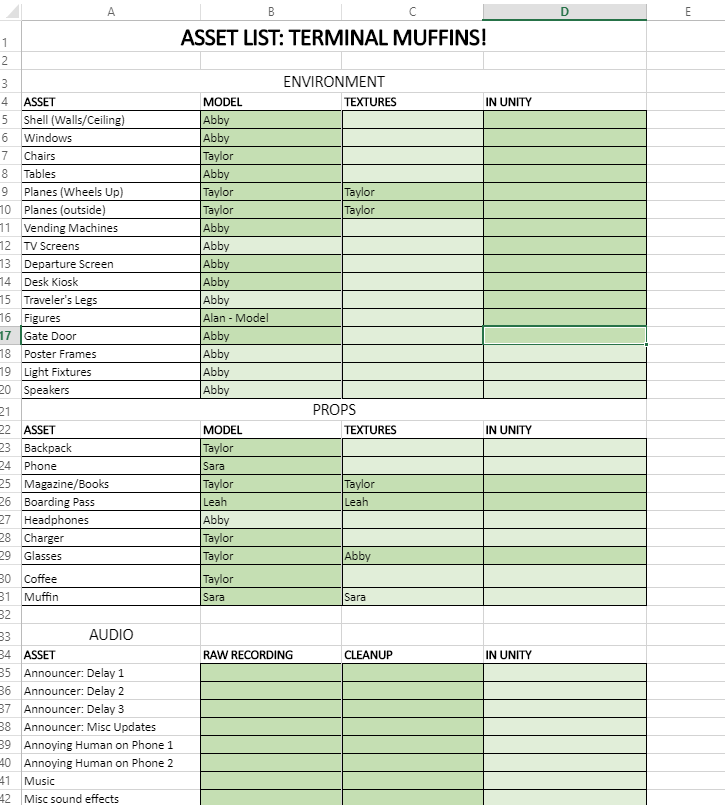
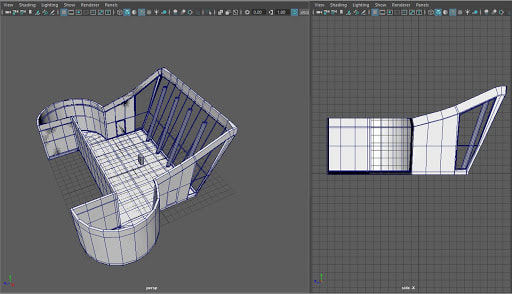
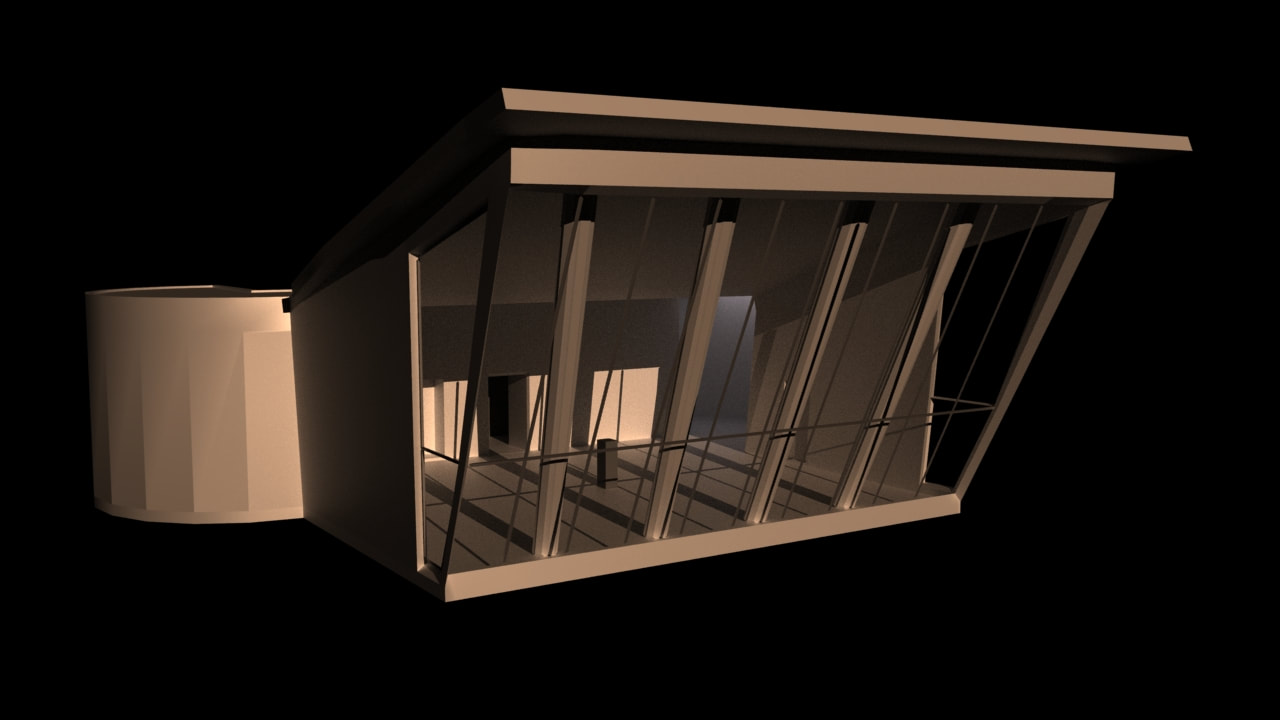
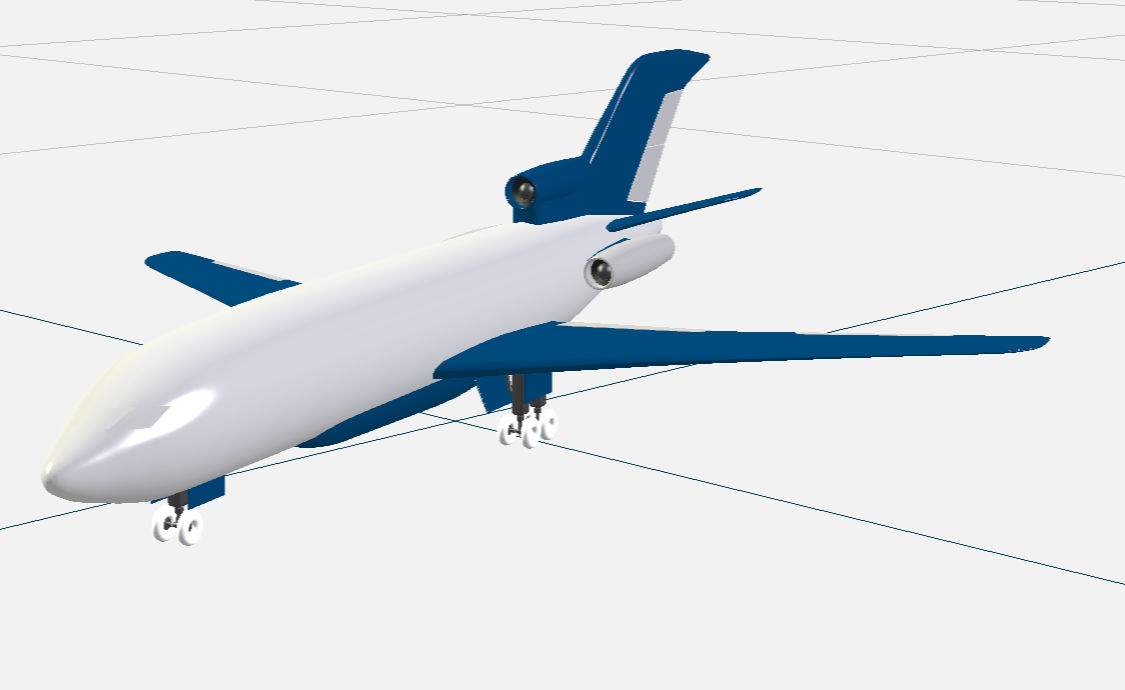
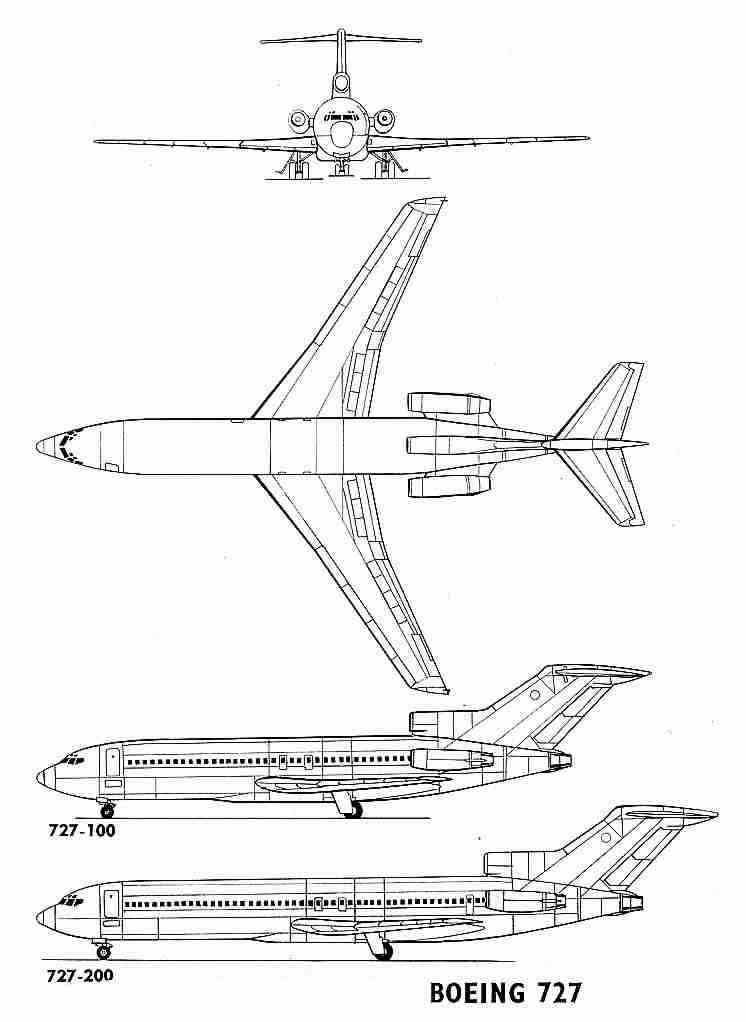
Over the weeks we created assets for Ter(li)minal. As well as learning more about 3D modeling, it gave us a chance at understanding how to keep poly-count low enough for the experience to run on a mobile platform. Planes, people stand-in's, muffins, seating, etc. were all modeled and textured in Maya. While not all assets were fully realized, we considered having the spatial design and timelessness be the main focus of our prototype.
Final Outcome:
Our group completed about 85% of what we set out to accomplish. We had some issues with debugging the experience, as well as limited time-constraints creating all the background assets/textured FBXs that inhabited the scene. Below is a video of the final assets complied into the Unity package and played through a Google Daydream headset:
*A short demo of the "Ter-Li-Minal" experience created.*
-Taylor Olsen
Project Team:
The Ohio State University Dr. Maria Gallo, College of Public Health, Epidemiology Prof. Maria Palazzi, ACCAD/Design Taylor Olsen, Graduate Research Associate, Design Breanne Butters, Graduate Research Associate, Design "In a grant to help debunk contraceptive myths in Kingston Jamaica, ACCAD teamed with project PI Dr. Maria Gallo, Associate Professor in the College of Public Health’s Division of Epidemiology to help educate adult women about contraceptive options in Kingston, Jamaica. This study is also a first-time collaboration between Gallo and ACCAD." My Roles: I was assigned the task of taking over the animated portion of the film while Breanne was away for an internship. Breanne had the storyboards and animatic created initially. It was then my task to refine and create vector assets, create rigs for characters, animate the motion graphics, and compile sound into a final project. The main programs that were utilized include Adobe Illustrator, Photoshop, Premiere, and After Effects. Software incorporated into after effects included DUIK, and Joysticks-&-Sliders.
"To address the study, ACCAD designed and produced a four-minute motion-graphics video debunking myths about contraception based on a script devised by Gallo and the medical research team...Palazzi and Design MFA students Taylor Olsen and Breanne Butters developed storyboards and characters for the script and then participated in stakeholder sessions with women in Kingston to evaluate and refine the script and visuals to address their needs and suggestions. The resulting video will be now be used in a study of 220 adult, reproductive-age women in Kingston to determine its effectiveness."
*A short trailer for the contraceptive video*
More information on ACCAD's Website: https://accad.osu.edu/research/projectgallery/debunking-contraceptive-myths -Taylor Olsen 
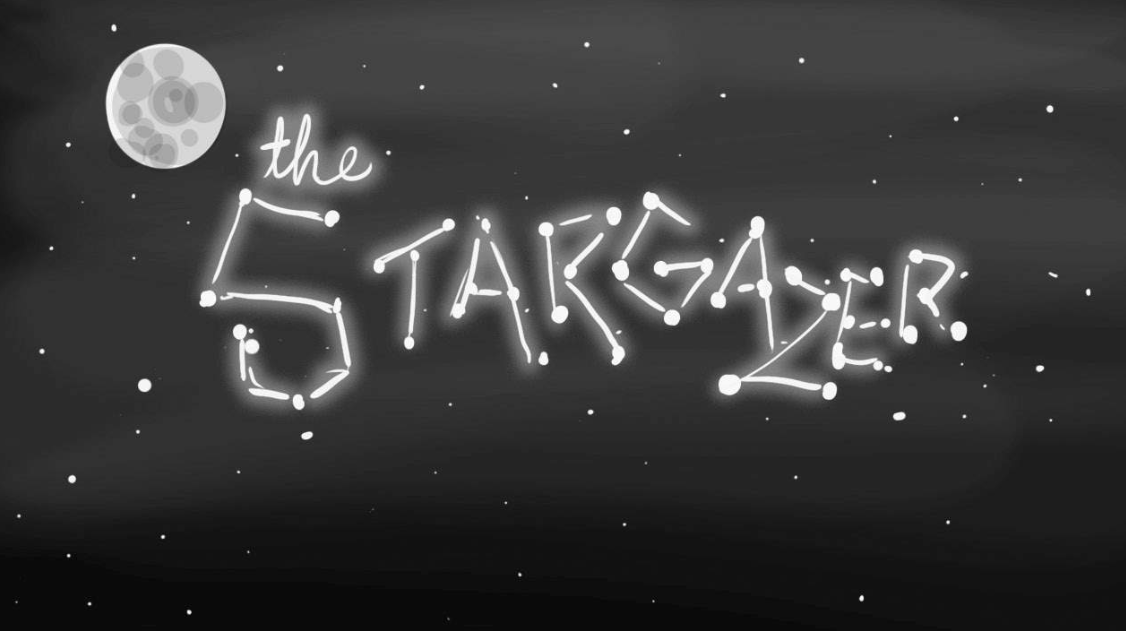
Title Screen - The Stargazer
Ideation:
The process of this film started as with most others: a story. Bruce E. of ACCAD had concocted a piece that addressed a modern concern of pollution and the desire to overcome monumental odds. This is how I would describe the synopsis of the piece:
Process:
I was a part of the writing process in the beginning. I worked with our Director, Animation supervisor, and Artist to help conceptualize the story, setting, and plot. I also worked as the part-time Production assistant, and as a character animator. I will cover most of my roles, and the those of others, for the posterity of the production. **The film itself was never finished, but many considerations of the process informed us of our mistakes and helped with future production processes.** Main roles (myself):
After working with the storyboards and refining them daily, I took on the task of plotting them into an animatic and working with timing. The result below is the completed animatic (not final) of
"The Stargazer". Sounds were placeholders and most were from freesound.org.
Then we moved onto creating a scene shot-list for the film. We ended up with about ~75 different cameras. I had to take all of those and apply them to environment with the conditions of showing the separate elements to the scene in an effective way. We waited on the 3D environment team to layout the scenes and select where the character was in relation to the camera. Later, steps followed:
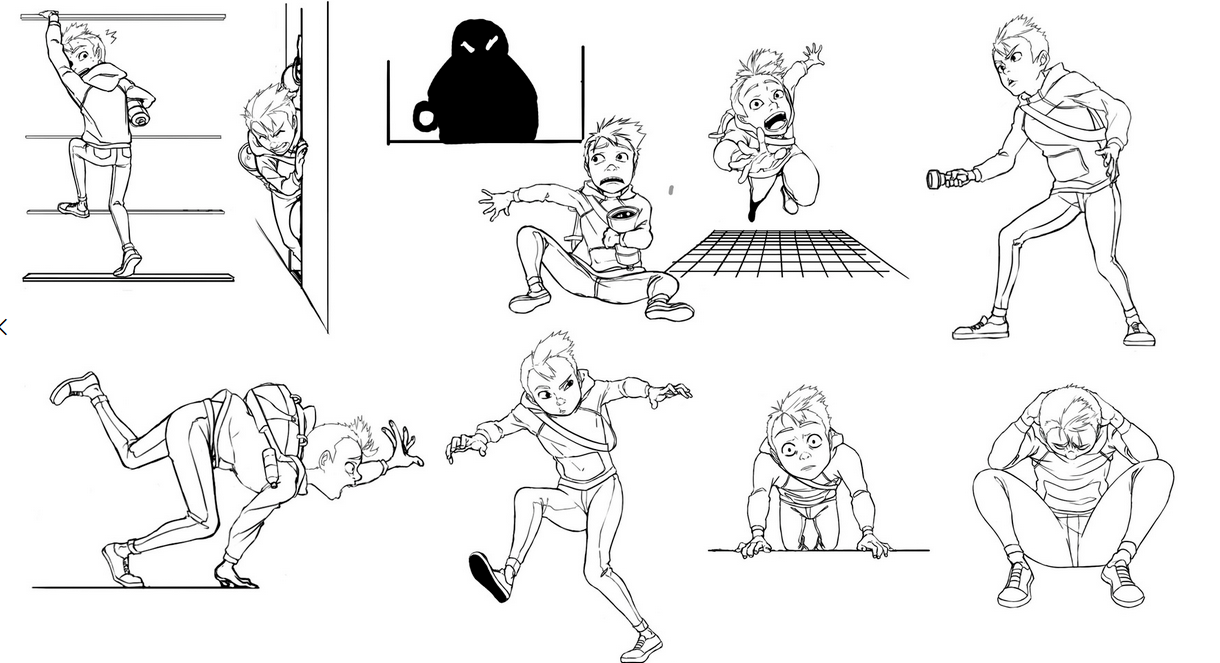
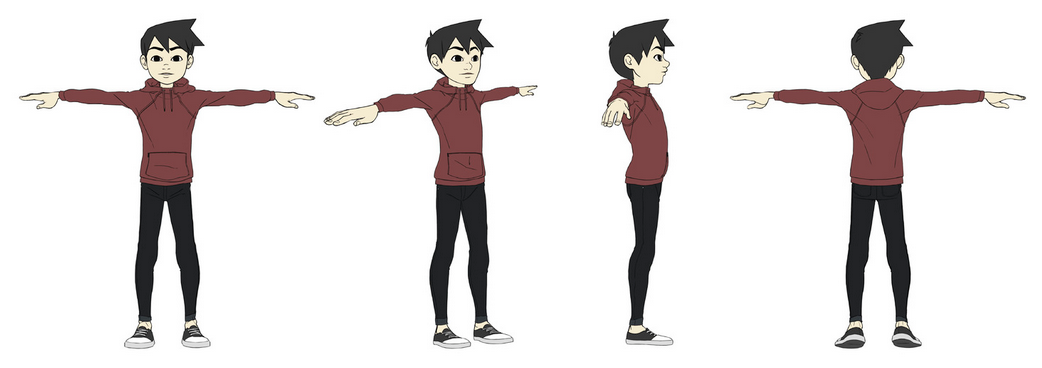
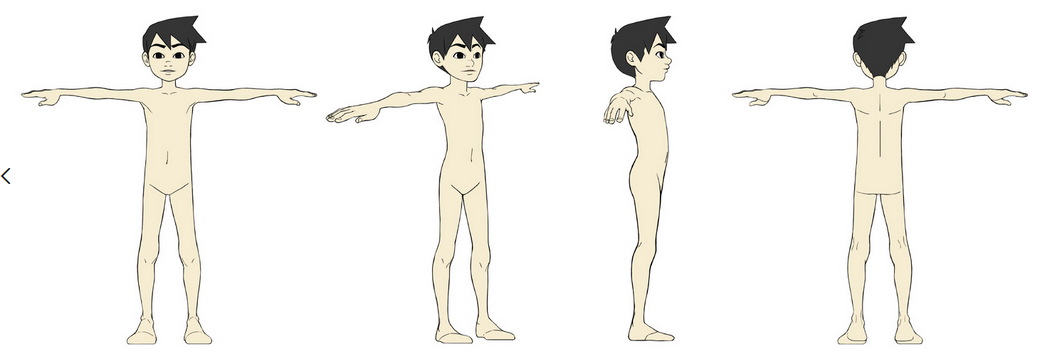
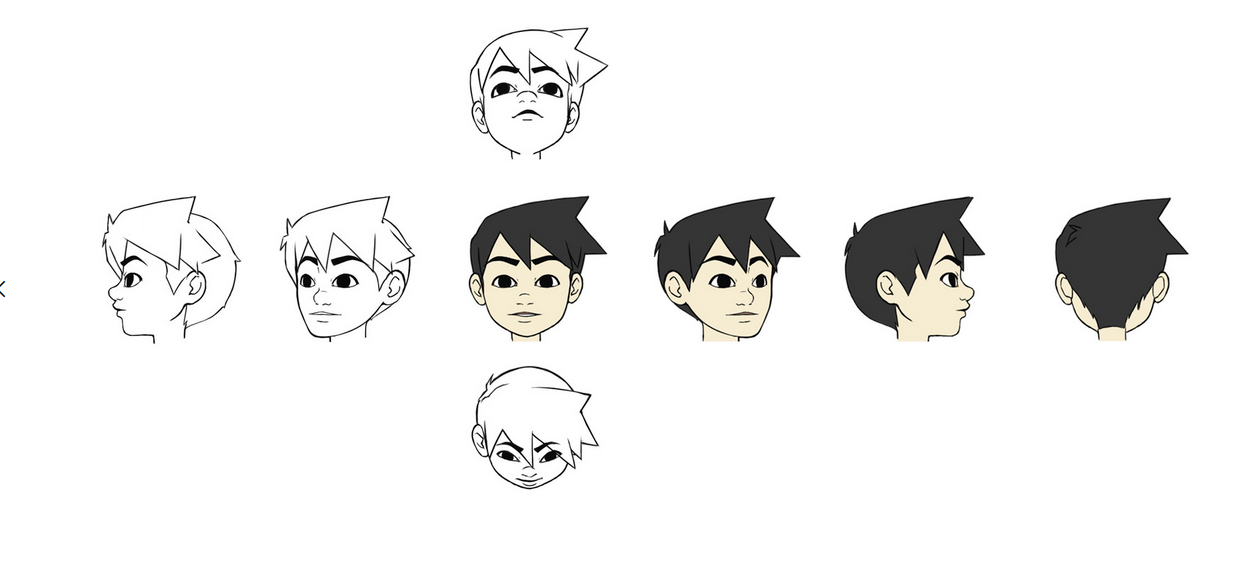
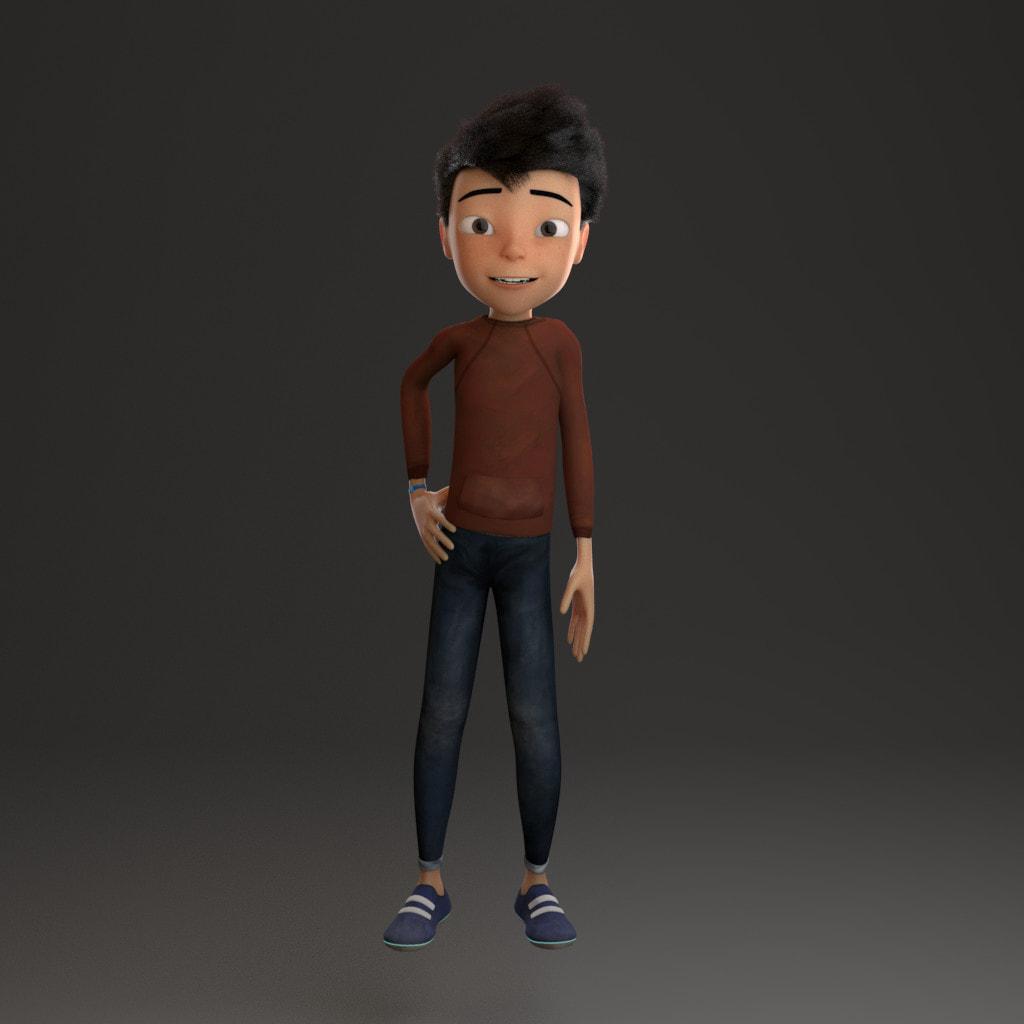
Next came concept work and character definitions. Most of the imagery is artwork created by Leah Coleman. You can find more of her work here: Leah Coleman. Below are character turnarounds, clothed/unclothed geometric considerations, and poses of Kai in moments of movement and rest.
Full character model found here: Bruce Evans - Kai Model.
Kai - Marmoset 3D Manipulation.
Below is an example of my character animation process from The Stargazer. Kai is attempting to open two large windows that lead to an outside ladder on the side of the skyscraper on the left. A (pre-finalized) character animation on the right side.
The character rig was created by Tori Cambell. She supplied the universal controls, the global scale controller, eyebrow rigs, IK / FK rigs and switches, elbow/knee pole vectors, and blendshapes for Kai. Below is an example of the rig. More of here content found here: Tori Campbell. On the right, you can see what our director, Bruce E., decided upon for a final teaser.
*A collection of Stills from the different scenes of "I Am."* Approach: First, I would like to mention that last week I made a mistake in the amount of content in the short. I happened to actually have 4 sections of words rather than 3. I miscounted, my mistake! Now, for this week I went through and chose color schemes that I thought would work for each scene. Above you can see some examples of the ones I chose. The scenes colored for clarity and the toon-shader's rendered quickly with the Deadline application in the labs. It can render via Maya-Software render as well as Arnold. I haven't rendered out an Arnold pass with ambient occlusion, but the toon-render looks very fitting in my opinion. I have a question-mark after 'sound?' in the title because I'm not sure if just having the static noise is enough to push the scene. While watching my animatic I happened to notice that each section could have either some soft sound effects or some sort of ambient sound attached to it. Choices Made: This week I began rendering fully completed scenes. I also made some changes to some scenes that I did not feel I had time to animate, but still wanted a 'complete' product. I once had a professor who said to me, "Get it to 80%, and take a short break before getting that next 15%. You'll never make it to 100[%] because perfection isn't real." I made some decisions about the color keying of the animation and the lighting behind the meaning of the imagery. I hope that people will ask questions about the somewhat intentional compositing of scenes. I don't want to explicitly say anything about what I interpret the scenes as, because I am more interested about their reaction to the imagery and their interpretation as well.
*An evolution of my awkward enthusiasm.* Inspirational Sources:
I had a tough time this week with contemplating my presence at ACCAD. But, speaking with professors from the Design department and ACCAD helped change my perspective. I felt a sense of relief while asking peers in the department if they thought I should continue. They said yes, and another wave of confidence came. It seems funny that it is coming so late in the semester, but I feel pushed even harder in the right direction now. I consider having the other graduate students a blessing; I'm not a religious person, but they are supportive until the end. I re-watched "Over the Garden Wall" this week. It will always be one of my favorite cartoons, as it is evocative, inquisitive, full of metaphorical inquiry and philosophy, and beautiful storytelling with wonderful animation. Questions Raised & Needs:
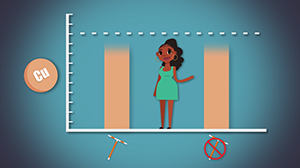
Next Steps: Continuing forward this week, I have to finish compositing the scenes together, consider the changes to the words between the sections of the film. I've thought about having a moving pattern in the background for the sake of making them less static. Maybe having an item from each scene in a diagonal pattern with brighter colors would help with conveying a foreshadowing before each section. Hopefully the rest of the week is as productive as this last one. -Taylor Olsen 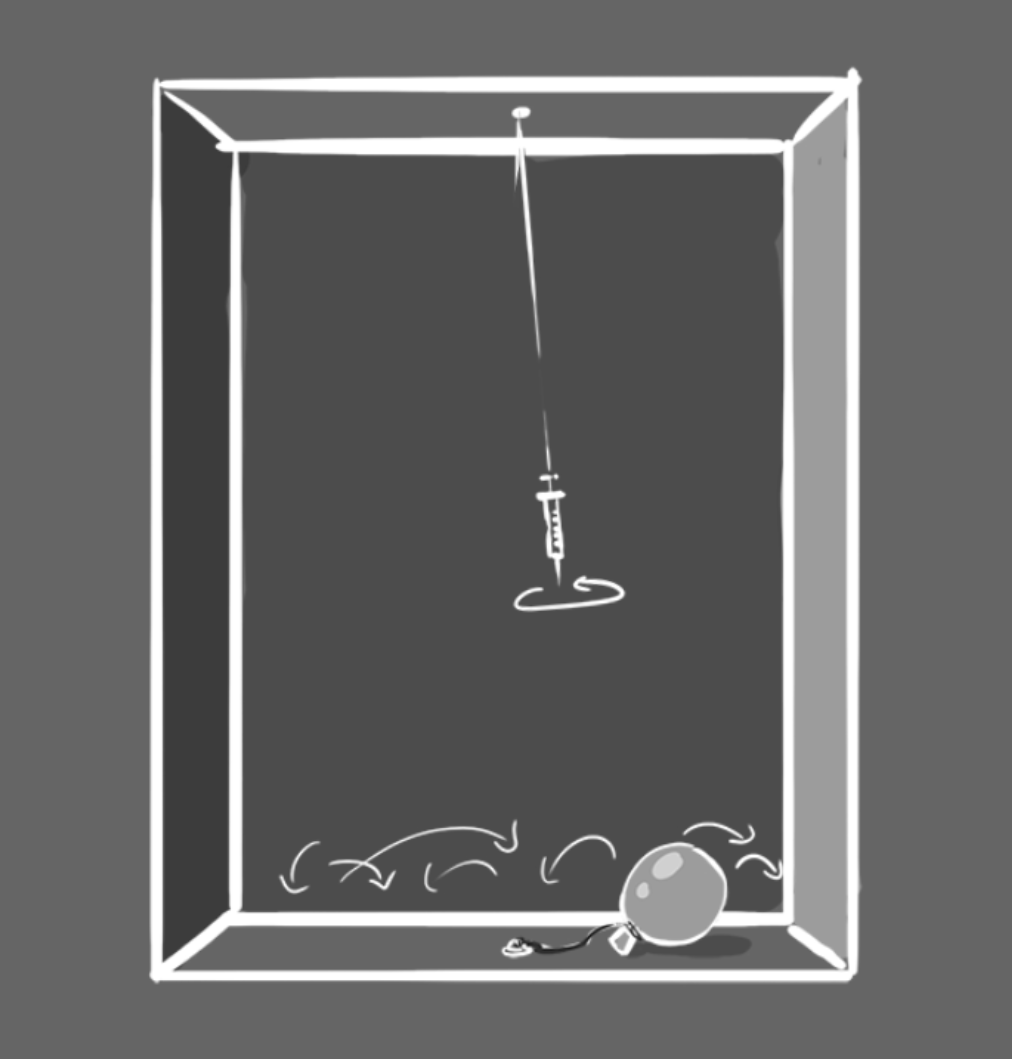 *Still from 3D Animatic for "I Am." Ironically, as the preceding 'I am patient with myself' statement says, I am trying to be patient with myself and the ideas forming from this short.* Approach: This week I began with creating and compiling more scenes together and made some decisions which scenes were actually important to the short if they were included. I have ultimately decided to remove the scene of "I am good at my job." and "I am alive." I also have decided that using Arnold will take up too much time for rendering and have decided to switch to Maya's Toon Shaders. I also went back and made some tweaks to Chuck's animation, making his visible front arm less static. I also went ahead and added in the rest of my animatic playblasts into the template animatic. Choices Made: The decisions to get rid of specific scenes have stemmed from the fact that I feel like I do not have time to model, animate, and composite these scenes. I also think that including these scenes takes away from the animation itself. To me, the text representation of the phrases seems a little too ambiguous for the short. I think sticking with 'Patient, Happy, Healthy' will help pull back from being away from the main scene with the narrator for too long. When watching the scenes, it almost felt like too much time was being wasted on scenes that wouldn't help pull the philosophic narrative back to the introduction scene with Chuck. 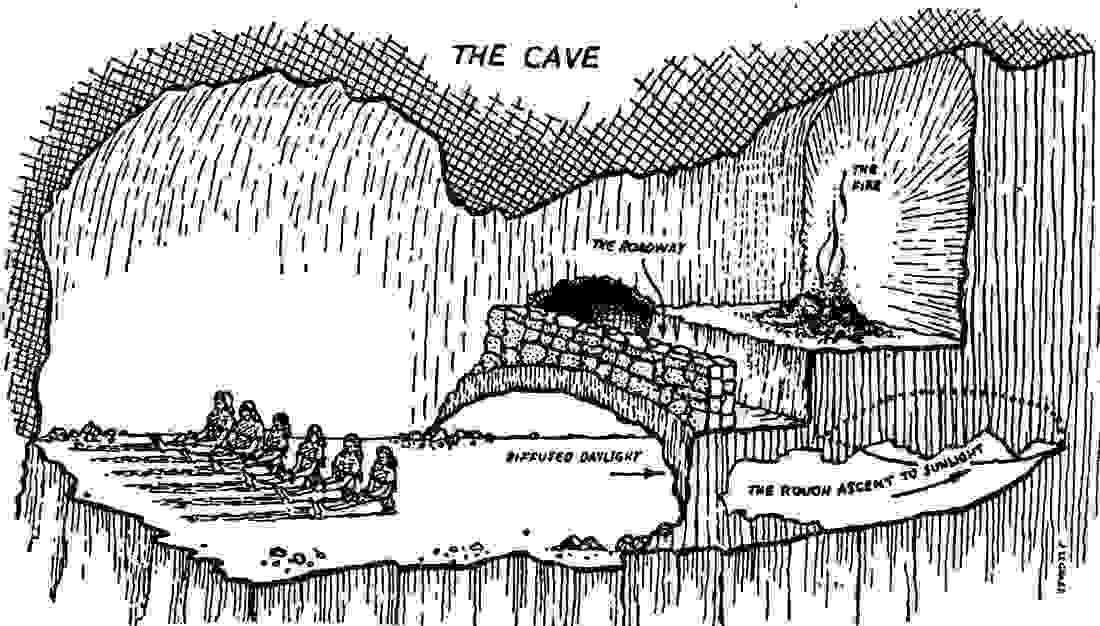 *A visual representation of Plato's allegory of 'The Cave'* Inspirational Sources:
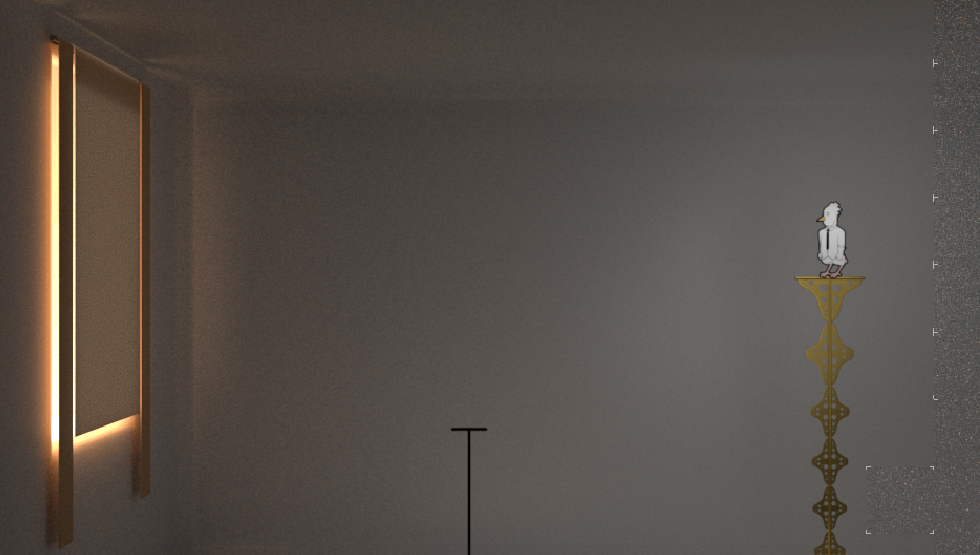
I gained inspiration this week from the allegory of Aristotle's cave. I feel like this instance of being unaware of the outside world and every aspect of beauty, form, and reasoning is a good metaphorical relationship between the setting of Chuck's initial spot. the window represents the exit to the cave door, the stands of the birds are the tiers of how close we become. The difference in the height and the more ornately decorated stand resembles our proclivity to to be more susceptible and willing to accept the pleasures in life and remain close-minded to what's behind the curtain. Questions Raised & Needs: This week I need:
Next Steps: This week, I just want to keep working. I have spent a good amount of time forgetting to take imagery of my work process and what renders I attempt. I need to be more proactive about documenting as I go, even if that means opening up my blog during the week and continually adding before Sunday. I have taken advantage of my own work time, but when I choose work time over my relationship with my Fiance and family, it becomes and issue. I have mentioned this week that I will be extremely busy and don't have the time to fully pledge myself to my outside influences. I feel a connection to the readings because of this, there is a term for a person in this type of situation, it is called an 'ethical existentialist'. An ethical existentialist is someone who pledges all their time to work and doesn't factor in family, friends, or free-time. This is their reasoning to live. I am not regarding myself as this, but sometimes it feels like I'm dipping more and more into this pattern. -Taylor Olsen  *Chuck (render) still from short "I Am."* Approach: I began this week by creating the complete mouth set to Chucks dialogue for the short. There were a few issues with having the slider control but the key-frames interpolated as "Toggle Hold". Some of the frames between the mouths wouldn't actually stay as the set key-frame and would switch halfway through. This caused a headache, my only solution was for these frames to be hand-keyed until the next sequential mouth appeared. I also began to color and prep some intro scenes for rendering, just to test out lighting schemes. I think the intro scene is the most important, as it will be seen twice throughout the film, and to me appears to represent the philosophic abstraction behind the visuals. Choices Made: I imported Chuck in Maya and began to deal the issue again of transparency of Arnold rendered scenes. Once I unchecked the "opaque" box in Arnold, and changed my naming convention of PNG sequence from _01234 to .1234, it read my sequence correctly and I was able to get the shader to work as needed. It was because of my naming convention having too much frame padding (i.e. [_#####] vs [_####]) and also because of my use of (_)underscore rather than (.) periods. I also decided that changing the audio wasn't the best idea, and decided to keep my original audio. I have also made the decision to cut out some the ending lines at the end of the intro scene. This will leave the intro with a little more of a pondering thought rather than a, "it is for you to decide. now without further ado, repeat after me" (excluded from final output). Inspirational Sources: My inspirational sources this week include being at the open house for ACCAD, and seeing how everyone was happy and ecstatic to work with projects that were happening. I worked with Lipman, a Design student to help showcase her app and collaborative work with professor Price. She worked closely with him on the layout, many people had positive comments and nothing to say when questioned about how the app could be improved. I noted more technical issues and some small anomalies and workarounds while playing with the interface. I was also helped by fellow students on what artists or researchers have done work in visualization that deals with the condition that animation can triumph over text where text fails to succeed. This being realized through animation isn't easy, but considers the implications of using the medium of animation to learn about key ideas/theories that aren't necessarily given a second glance because of imposing information. A classmate (Zach W.) led me to some different researchers in the field such as Greg Smith, Manovich, and Peter Greenway.
Questions Raised & Needs: I have been suggested by my professor to ask a fellow classmate named Lakshika who would be able to aid in the creation of procedural-generated and animation-cached scenes in the short.
 *A rendered still from the combined 2D & 3D intro scene of the short, "I Am." [Arnold Render]* Next Steps:
Honestly to just keep working towards creating the short. Change my render modes if things take too long (Arnold takes a while, Toon does not). Consider changing small body motions of Chuck if I think something looks awry. Try to completely render first scene and attempt to try out Toon shaders for backup. Assess how lighting can play a vital part in the opening scenes as well as the others. -Taylor Olsen 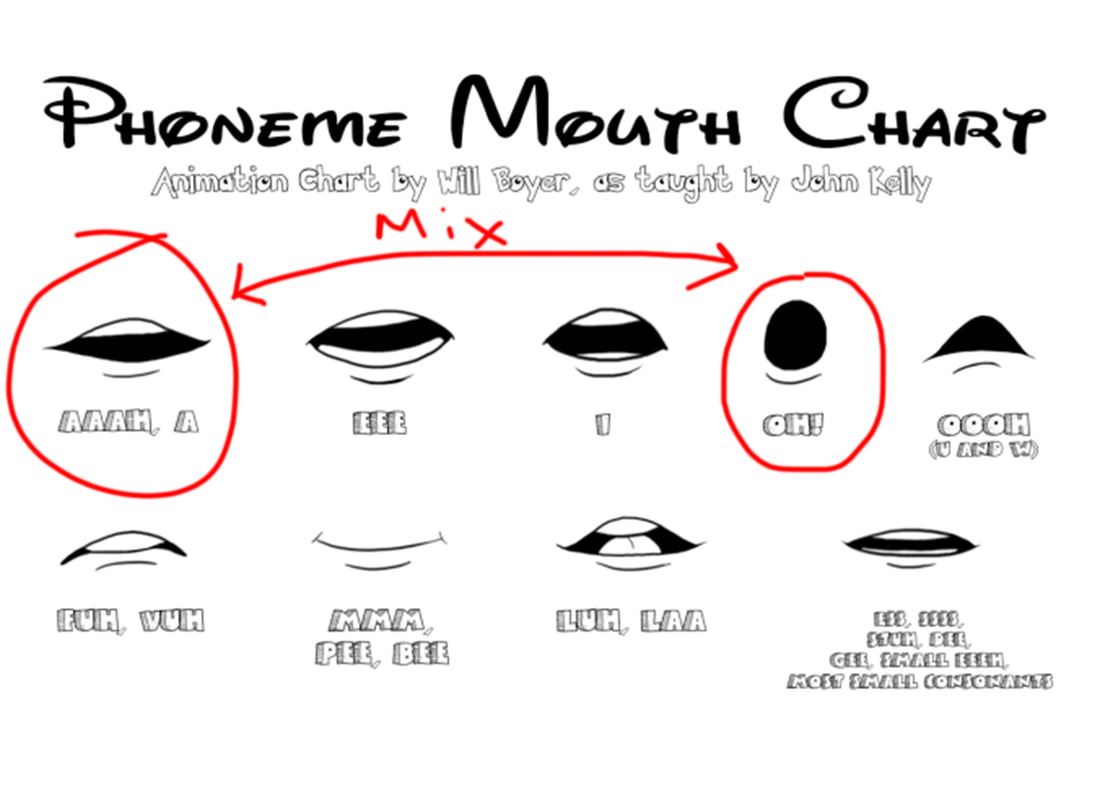 *An example of a mouth-phoneme sheet for reference. the red line is the mix of the two mouth shapes that I needed to create for Chuck's lip-synch to work properly.* Approach: During this week I created more assets for the short. I had personal apprehension to create any assets this week, but sitting down and having a podcast or a background noise helped with putting my mind at ease. It felt good to accomplish a good amount of work and scene creation. I also completed a few scenes regarding asset creation and continued to test and animate Chuck's mouth. I did a quick test of me saying "The quick brown fox jumps over the lazy dog." to make sure that I could animate his mouths correctly. I found that it looked like Chuck was missing one syllable in his mouth files. I watch a few difference cartoons and it was a form of "AH" but with the edge of the lips more in an "OO" position. For the sake of the dialogue looking weird without this mouth position, I added it into the rig. In Maya, I used more of the MASH plugin to make the pile of pills to work for the scene with the baby bottle. If I would have a successful attempt in creating this asset, I decided that I could use MASH for the scenes with the bananas and the pile of money. Choices Made: I reworked most of the audio file that I initially created to make it sound more surreal. I added an echo effect to my voice and added a second track on top of it with a different pitch to give it more of an overarching narrative effect. Before it felt like it was too quiet and boring. I'm hoping that the echoing voice will help the audience with remember what was said, almost like a passing thought that won't leave the head immediately, but give it more time to interpret a meaning. I decided that I would create my own assets for the short instead of using free online models. I wanted to dust-off my modeling skills and get back to understanding more of the knitty-gritty of modeling in Maya. I created a single chain-link and duplicated that among the 4 different spots that it would happen to connect to the central platform in the baby-bottle scene. I also used this method in creating more of the ornate decorative objects that were adhering to the bird-stand in the first scene with Chuck. The scenes are relatively easy to create, as they only have a few assets and don't need a high-level of complexity in order to get the point across. Inspirational Sources: This week I attempted to find relevant sources in philosophical-abstraction based on humor. Unfortunately I didn't find anything that pertained to this, but I was recommended a video from Maria called "Is the Man who is Tall Happy?" In this film he attempts to recreate the conversation from himself and Noam Chomsky. Noam is mainly talking about the evolution of language in people, often citing how we as children know much more than the naked eye can perceive. The director of this film also wrote and directed "Eternal Sunshine of the Spotless Mind", a psychological film that dealt with the memory and emotional disparagement that comes with it.
I feel like the sources I have been finding have been much more text-heavy speaking about the implications of using a more visual-based model in creating philosophical abstraction, but no actual proof that it has been done. This film of "Is the Man who is Tall Happy?" is one of the only sources that I have been shown/found to be a more direct and blatant interpretation of the textual to the visual. Questions Raised & Needs: I have had issues with logging into computers around ACCAD this week, and have been utilizing more of my external hard-drives to transfer files between desktops. It seems like this has been happening to many other students. We've gone to our tech supervisor and asked if there is a way to fix this issue; a solution hasn't been found yet, so I will continue with working from the flash drive. I feel like I don't have a professor readily on campus that I can ask about issues with using MASH in Maya or one who is procedural-animation adept to mentor me with the issues that I am running into.
Next Steps: Some foreseeable issues I see happening are me not having the full capacity and understanding of how to use MASH's procedural nodes for creating and baking the animations of the simulated objects. I also do not have an idea of how to have the scene with the banana's fall into the scene and expand like balloons to work. I think that will be part of my process this week for what to accomplish. I am continuing with animating Chuck's mouth for the dialogue and making sure that I have enough knowledge to create and continue forward with asset creation in Maya. If I were to change my approach this week and what I thought needed to be accomplished, I don't think I would have time to complete the short. I am still not sure if I will have enough time to complete the short at all, seeing as it's about a 3-5 min time-span and I don't have enough time at hand to create, animate, composite, edit, and finalize the short. I am going to try my best, but it may spill over into finishing the short in the summertime. -Taylor Olsen 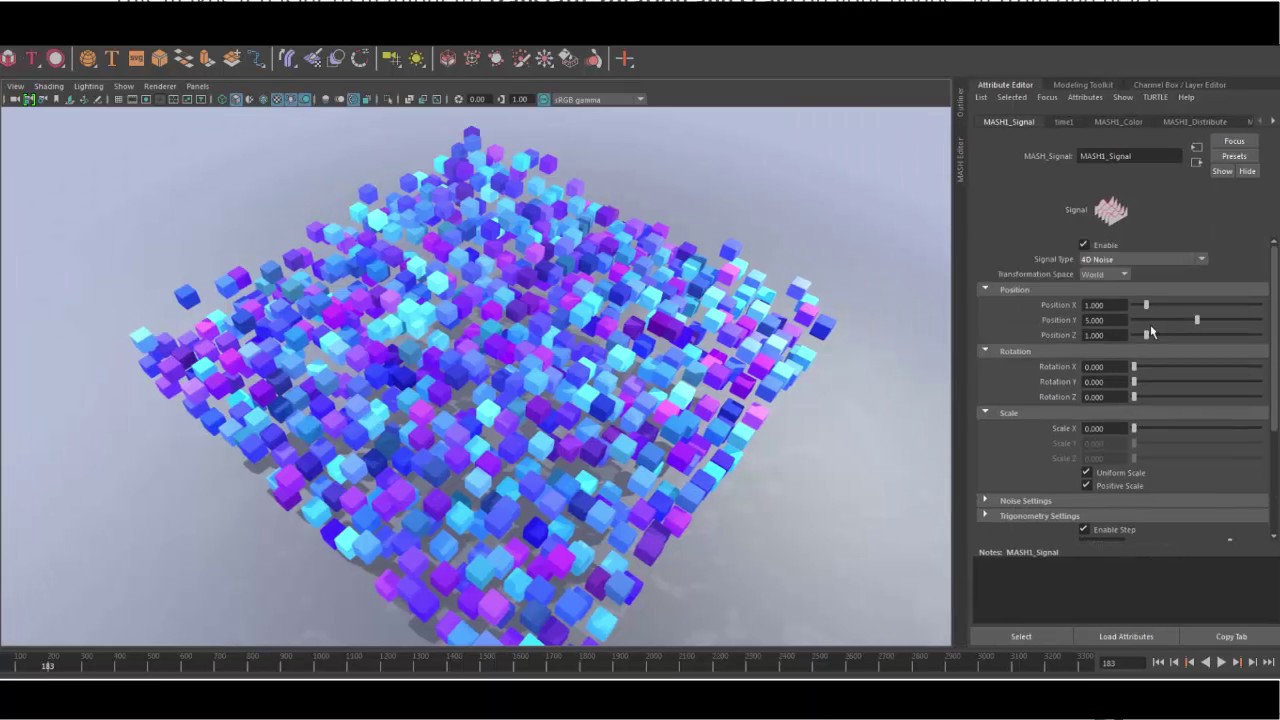 *Procedural Animation from the MASH plug-in for Maya.* *Note that the week before this post was Spring Break, the reason behind the date not matching up.* Approach: This week I began to examine the relationship between my work and the comparisons that could be made between the theoretical implications of the animated short based on audience reaction. I utilized some MEL/Python scripting from Maya's website that utilizes the MASH (procedural animation) plug-in to create large bodies of physics objects. I also started to create a chart for another class assignment that had us question the meaning behind our choices, and made use of other classmates to see how they approached their own research. We also had a visiting animator, JP Sans from DreamWorks Animation, who had us complete a 4-hour workshop of his that he happens to teach on CGTarian.com . Overall, HE WAS AMAZING. I have never seen an individual have a more beautiful presentation and have it so well planned out that I was actually engaged in learning for 4 hours straight. After the end of the sessions, I ACTUALLY felt smarter than when I had walked in. We went out for drinks and dinner afterword, and on Sunday had him look at our short for out Production Animation class. He has worked on everything from Ice Age, to Rio, to The Last Guardians. I SINCERELY hope he comes back again. Choices Made: I didn't use my time to the best of it's ability this week on creating assets for the short, but I did happen to create and utilize the tutorials from the previous week on how to create assets more quickly than if I modeled them piece by piece. I eventually went into the MASH tab of Maya as well and found that it would be extremely beneficial to my research. Mostly, MASH is used for particles and large body containers of objects. It's very fast as well, making the time needed for creating a large pile of pills for my short be a breeze instead of placing each individual object. https://knowledge.autodesk.com/support/maya/learn-explore/caas/CloudHelp/cloudhelp/2016/ENU/Maya/files/GUID-5F45C398-D87D-424E-9F00-51D9FAB5A40B-htm.html *This link leads to the MASH section of Maya. * After doing some more research, I learned that MASH is used for procedural animation and hasn't necessarily been used often yet, but many people are starting to catch on and realize the potential of the effects. Relevant Sources: I didn't find many sources to utilize effects and create new assets for the short. But I did find sources pertaining to the reasoning behind my research. I will include these as files of the downloaded PDF's. I found a particular existential philosopher from Australia with the last name "Lippit" who has done research about existential laughter. I dug deeper and also found someone who cited Lippit and used his basis of existential laughter as an analysis of the ethical impact and satirical exaggerations of the "Simpsons".
Questions Raised & Needs:
Next Steps: Work more on the project this coming week. Create more assets and play around with Toon-shaders again to see if I feel like they are still viable in the visual development of the short. I have also considered asking my other graduate students their suggest on which render looks more visually appealing; I am apprehensive that they will pick the Arnold shading, but I also want to explain to them that this isn't necessarily meant to look as realistic as possible but only to look different than Chuck. I also have some readings to complete for the following week assigned for class. I'm glad for them at the moment, they provide a large variety of helpful and uplifting information about the animation medium. I also feels like it gives me more of a chance to work on my own things rather than spending too much time finding articles about what I might work on and consider to be useful. -Taylor Olsen
*My horrible video of Pamela Z explaining about "Timbre" in sound.*
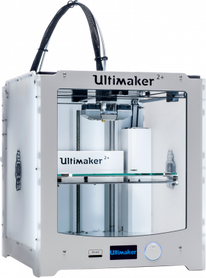 *The Ultimaker 2+* *The Ultimaker 2+*
Approach:
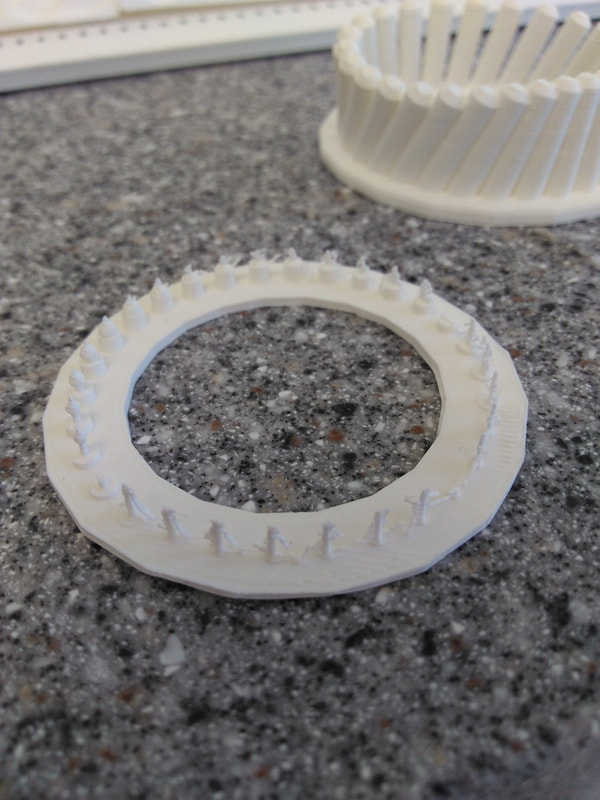
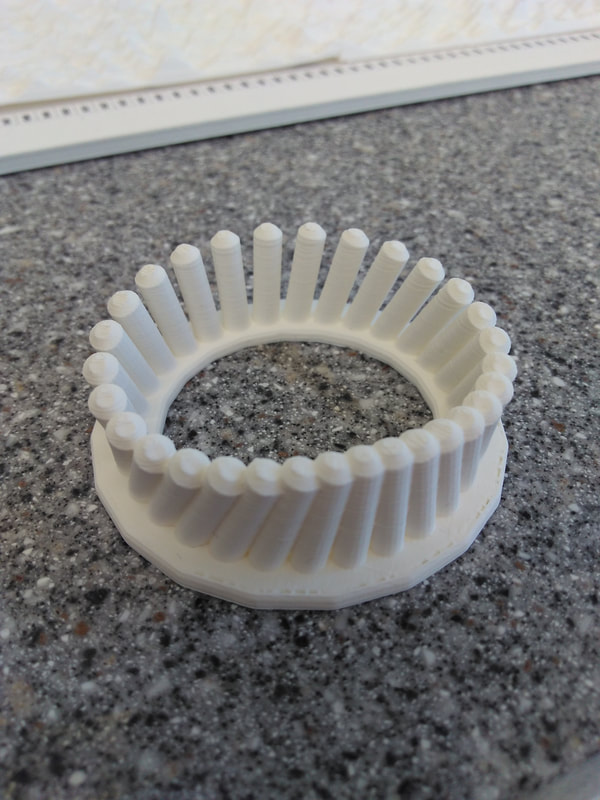
This week I was involved in the creation of different assets for Human Tech at ACCAD. It involved creating and utilizing humane technologies. In the definition of this term, it states that the technology it involves is safe for everyone to try and experience using; I can attest that this is true for the most part. Some of the tech that could be used by the students and faculty were almost too complex for one to fully understand the initial uses and boundaries of what was being showcased, or the exact opposite to get anywhere at all. Pamela Z was a visiting person of interest this week, and she showcased her MIDI Ultrasound 'theremin-like' musically astounding pieces. Alan Price and Matt Lewis showed off a robot "pet" that vibrates and moves based on touch and can be controlled using set-driven keys in Maya, and then sending that information over to Unity for further experimentation and key-frame animation. They also utilized a MEL-script for Maya that allowed for the creation of 3D-printed Zoetropes. These Zoetropes would then be placed under a strobe light; and depending on the frame rate of the animation and the print, the strobe could be adjusted to either match and create an optical illusion of the animation playing, or the illusion that it was playing in reverse. It usually worked better when it was in the dark, making the exaggeration of deliberate strobe-light along with the spinning print easier to see. The animation itself could range anywhere from 2-30 frames. Most students stuck with 30, as it allowed for more time to see the animation play out, and extra key-frames for a clearer sense of motion. The script would place the animated object around the platform on the bottom, and would allow for changes if necessary. Some prints came out okay, others were a little hard to manage, as they were too small to print, or you couldn't necessarily see what was happening without a magnifying glass (as they were smaller than the palm of a hand). The software used was CURA for the Ultimaker 3D printer, and Maya OBJ's were exported and imported into the CURA software.
*[Left] A reference example of the 3D-printed Zoetrope. [Right] A video of Pamela Z performing.*
*Similar instances occurring during Human Tech week at ACCAD.*
Choices Made:
While most of this was going on, I was also assigned with the task of creating another proposal. This one is for the last 6 weeks of the semester, and requires us to either continue forward with an existing project, or stop and create a new project outline for ourselves. I have ultimately decided to continue with this project, as when discussing with Maria Palazzi about the possibility of where my idea should be going she mentioned to not worry about others being responsive to your ideas. Sometimes it is better to ask your own questions to them in order to drive the conversation to a point that you know is going to be beneficial to yourself and your work. It will also give me a good chance to go back and assess my notes in greater detail and give me a chance to create more in Maya and After Effects, as well as merge the two. We also had a choice to pick between doing assignments for Alan's Humane Tech projects for the week. Or to do collaborative work and create storyboards for the Theatre team. I felt like I had enough experience creating storyboards for other people and for myself, that I would tackle something more technical but also related to my area of study in experimental animation. At first I printed a model that didn't look anything like I had thought it would, this is because it was too small for the first print, and didn't hold up well with the plastic. It was streaking across the small structures, and when attempting to cut off the small fissures, it would break the model in two. When looking back at Alan's original model, (as seen on the top of the tower of models), the pieces are touching each other and are combined to give a better area to print. In the videos below, you'll see the rotation of the pieces and the possible prints I wanted to try out. I only decided to do the initial design (the ball with the cylinder with spaces between it) and the final one (undulating cylinder). The final design allowed for a smooth print along with the ability to more easily adjust what I wanted they cylinder to animate.
*[Left] The different Zoetropes I attempted. [Right] The somewhat funny combination of all my Zoetrope attempts.*
*[Left] My first attempt at 3D printing the Zoetrope. [Right] My second attempt at the Zoetrope.*
*[Left] 3D-printed Zoetropes from Alan Price, Bruce Evans, and myself. [Right] My 3D-printed Zoetrope.*
During the week we also had a visitor from the University of South California (USC) who was showcasing her work from being a professor there. She had many aspects of virtual reality healing and gaming, but also a good degree of experimentation of getting disabled people to utilize technology in gaming as a healing medium to either their physical therapy or mental state.
I unfortunately didn't have enough time to get to speak with her about this quote that I took a picture of. I think that it would relate back to my current philosophical research work and getting my audience to interact with what I am presenting them. Human tech week definitely got me thinking outside of my comfort zone, but not too much that I didn't feel especially apprehensive to do the projects. I think that is the main point that they were trying to explain to others; humane tech is tech for anyone to experience and experiment with.
Relevant Sources:
This week I researched some different tutorials that would be useful in the creation of the animated short at hand. I think the curve tools are something I would like to investigate further and their usefulness towards creating assets more effectively in the long run.
*[Left] Using the curve tools as a creation tool. [Right] Using the new MASH tab for creation along curve tool paths.*
Questions Raised & Needs:
This week I plan on taking my animation skills further, and relaxing a little more. It's spring break, and it is well deserved! I hope everyone else has a good spring break as well. I do not have any plans, so the plan is to create and have some free time to explore my creative output in Maya and how I am going to incorporate the findings of the week into my animation. I assume having some sort or relocatable aspect of Human Tech week would be necessary to include in this animation. It seems like the right thing to do, but to also consider when asking more metaphorical questions to an audience. As for the week, I enjoyed all of the different events, and expect to upload some different photos of the Zoetropes I printed, as well as the other attempts from different classmates. -Taylor Olsen *Rough animatic for "I Am."*
Approach: This week I utilized my time attempting to convey my approach for this animation. I spent some time making decisions for myself about this animation and it's meanings behind the arbitrary imagery. I considered a different approach to the representation of animated cinema apparent in the animatic. I also considered changing my topic altogether, as a reading from the week prior mentioned finding relevance in our works between others, making the work feel more wholesome and represented in a more compelling light. My attempt fell short I believe, and have had some time for self-reflection about the animation as a whole. Choices Made: I don't believe that I conveyed my approach correctly, and that made me question even doing the animation at all. But, I came away with taking my findings from experimenting with having animated content in Maya rendered into a 3D scene. But also, having my content "fit" into the scene, and feel like it was also a piece that was necessary. It was ultimately a failure as I didn't get the 2D imagery to display in the rendered space in Arnold or in the Maya standard render. I tested separate composite background imagery utilizing Maya and Arnold rendering. The left image is the Maya standard shader on the bottom layer, and the ambient occlusion Arnold rendering with a Color Burn layer style on top. The opposite for the other, except with an overlay layer-style in Photoshop for the Maya layer. I tried to find the best compositing for both the layers that looked something towards my intended visual outcome.
*Arnold (Top) Maya (Bottom)* *Maya (Top) Arnold (Bottom)* I fixed up my chuck rig as well and tried to fix some minor issues, but also attempted to get the TIF test video with transparency to show up transparent in front of a Maya standard shader. In the examples below, we see that I got some sort of transparency from the background going, but not the portion that I wanted to show.
*Video attempt at using TIF sequence* *Video showing minor tweaks and layering fixes to Chuck* I've since then found some help from a fellow classmate who says he knows how to make the background not interfere with the transparency or the shadows appearing as the shape of the plane.
*Attempt 1 & 2 of using transparency in Maya to show the red square on top.* Relevant Sources: I happened to find an online forum where a person had solved the issue with the transparency rendering with Arnold in Maya: https://forums.autodesk.com/t5/maya-shading-lighting-and/transparency-renders-black-in-arnold/m-p/6790341?lightbox-message-images-6790341=308962i77F1FB6077CF012C#M18539 This link here is what I found that could help me for my next steps (If I happen to go through with the animation). As well as another link with people having the same issue: https://forums.autodesk.com/t5/maya-shading-lighting-and/maya-2016-how-to-hook-up-alpha-channel-in-psd-node-and-see-it-in/td-p/5750901 But, in the course of writing this, I had an epiphany of how to solve the issue using the node editor: 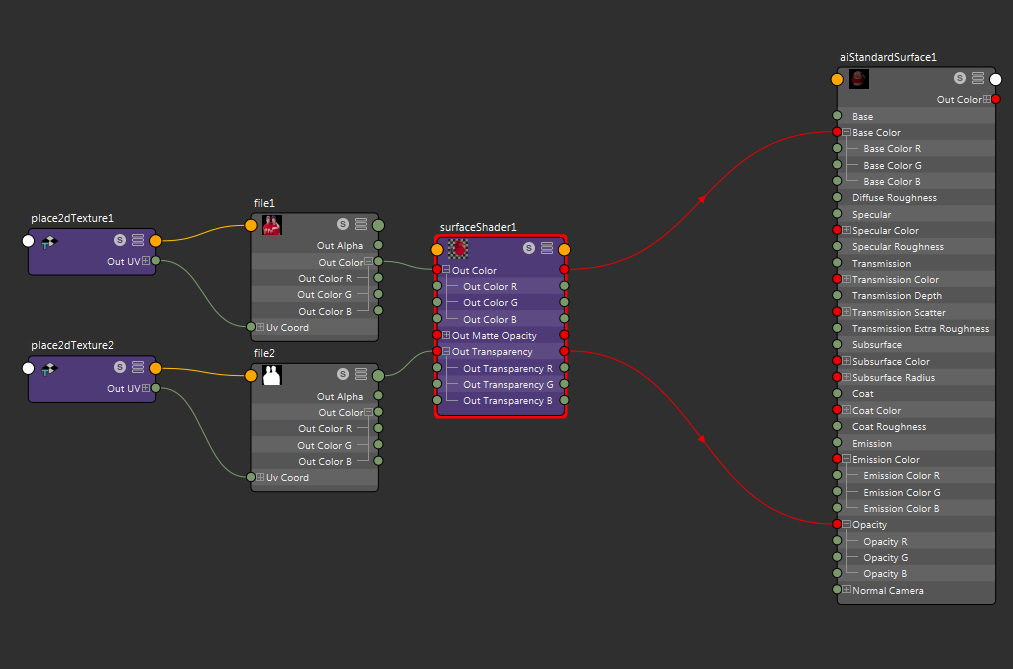 *Image of worked out Arnold Transparency Shader* [Uses PNG] Shown above is the finalized texture output for Arnold to allow transparency in it's render software. I have not tried it in tiff sequence yet, but it appears that I have for the moment solved part of the issue I am having. I imagine I'll have to take my rendered tiff sequence files and make a version that also has the Black and White alpha channel map that fixes the issue. This should also mean that I can use a .PNG sequence (something I am more familiar with) as the final output for the 2D animated character.
*Block (left) Transparent Map [White for visible]. Block (Right) Color Map [Background transparent].*
*Using a PNG sequence with the node setup for moving 2D objects over top a sphere.* Questions Raised & Needs:
Now that I have figured out how to utilize the transparency map, this animation shouldn't take long to get going. If I have my animatic down to a point next week that I feel comfortable using it as the base, I'll immediately start trying to integrate a rendered PNG sequence of chuck into a Maya scene. This way I can make sure that it works (first off), and secondly test whether or not moving the camera will be an issue on the flat sequence area. I also want to test lighting on these 2D moving image planes in the Arnold render, just to make sure that it's not messing with the geometry in a weird way. I think I'll also play with the glass-shader in Arnold as well as how the transparency appears behind the glass, and to also see how it warps (if it works). -Taylor Olsen 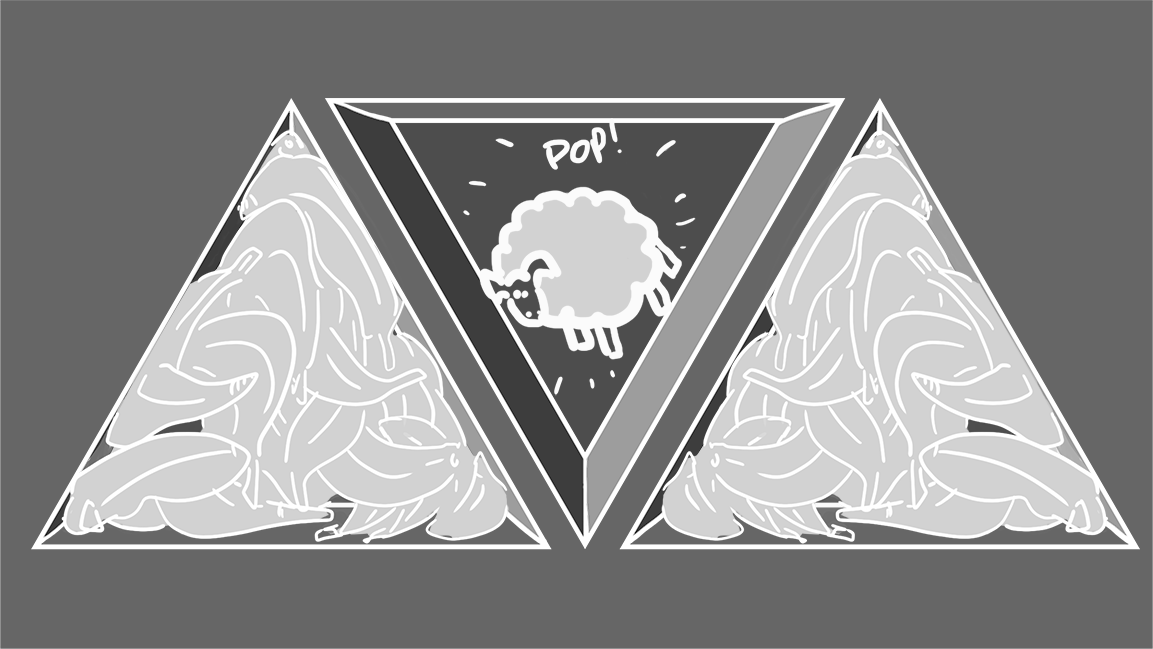
*A still from the animatic that was created this week.*
Approach: For this previous week, I dedicated my time to creating an abstract for the animation that I would like to work on more, and put it to a storyboard. I'll record myself to add some audio, as the timing of the shots may be off for the moment. I also went through my notes and picked out sections of supportive material that would help with the script and my explanations of animated content. This week I really just wanted to focus on creating. I still don't feel completely ready with the amount of information I found, but I think more is to come as refinement will also happen eventually. I also spent more time with Maya and figuring out how to superimpose "Chuck" into the different scenes. As it would turn out, you must render with the Alpha-Channel in a TIF sequence to get it to work. Although I figure I should be able to put the two separate animation types together in After Effects, I think knowing how to utilize this technique for the future when using Maya will make it for the better. I've had a few times where it does not render out correctly, or it just won't show up at all. I ended up doing some small tests this week with chuck regarding rotation parameters near the hip sections, seeing what range of motion was possible with the current set-up. Choices Made: I have used the week for creating rather than waiting for an idea to come to me. Although I am aware that I had been creating the idea in the back of my mind, it still would have benefited me to continue forward with some sort of creating EARLIER as determined in my proposal versus later. For the animation, it is a juxtaposition of the two studies that I went through these past 4 weeks based on Existentialism and Humor. I found that there is a specific name for the type of humor that regards death an life as a joke, which would be called "black humor". I didn't happen to mention this type of humor in the actual abstract for the animation, but this could inevitably be used for some sort of supporting evidence of process. I also didn't explicitly mention it because I am not necessarily attempting to "laugh" directly at death, but as mentioned before: to juxtapose the two together. I used Photoshop for the storyboards, and I used
Relevant Sources:
I didn't Have much for relevant sources this week either than the creation of the animatic and story narrative. But I did find an article about non-linear narrative: https://www.theatlantic.com/health/archive/2016/01/linear-storytelling-psychology/431529/ It was good to read that even though some non-linear stories or films aren't appreciated by the masses, an aspect that they do have is this: suspense, curiosity, surprise. After reading about the 3 aspects of non-linear films, I felt more secure with the what I had recently created. It made more sense the more I worked with the problems and the images being shown. It was definitely a necessity to create along the way rather than towards the end. You gain different information about the project early on rather than finding out later. It may include re-arranging the time devoted to other aspects such as research through reading, but it shouldn't be seen as a caveat to learning in general. A general balance between the two is good for productivity, but everyone inevitably chooses a different path each time they begin a project. I was just my fault that I began taking too much time to read, but I have learned from my mistakes and will utilize this reasoning in the future for a more efficient use of my time. Questions Raised & Needs:
Next Steps: For the next steps of this week I imagine our gears will be shifted more towards Human Tech. I am not sure what to expect at the moment, but assume it will be something with interactive technology that is geared more towards the betterment of mankind/people. Regardless, if I were to continue with more steps toward this project, I would designate more of my time utilizing the programs to create more of the scenes in a fully realized 2D and 3D format. I would also like to build more of a foundation for myself by refining the animatic and story when necessary. I only did about 3 passes on the story, I got rid of different scenes, but it almost feels a little too short for the moment based on the amount of "rooms" shown to the audience. -Taylor Olsen 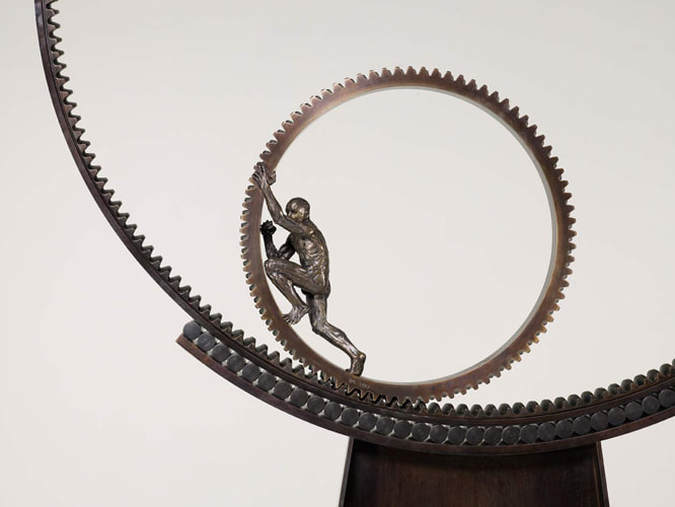
*A visual example of what kind of environment a possible shot will utilize for the animation* Approach: During my time for research this week, I became more in depth with my readings and utilizing the Ohio State University article search. I began by compiling more notes based on readings from the French philosopher Sartre's book "Existentialism and Humanism". Many of the findings regarding humor were absent, but some articles from online with similar philosophers were helpful in creating a connection between the two subjects. I also went back through and renamed most of the parts of my Chuck rig as I couldn't figure out how to change image assets without having to re-rig most of the character from the beginning. My initial idea for storyboards have started to be realized, and I began with questioning how I would address a possible research question: "How can the animation medium bridge the gap of humor and existentialism?" I am a little more hopeful now that I have decided to stick with this project and make something meaningful out of it. As well as this questions, I will include others later in my 'Questions Raised and Needs' snippet. Choices Made: I have still decided that I overloaded my week with readings again, but there is something that feels good about myself in doing these readings. Growing up I didn't actually finish many books in my teenage to young adult years, but this semester has proven to me that I have the will that I once did when I was young. I have completed many readings and feel good about the information and the notes I retained. This week I also investigated some experimental narrative storytelling. I watched some Youtube videos pertained to life. I have investigated Escher's "impossible shapes" idea and imagine my animation using these to represent the repetitive nature of life and the immeasurable and/or unstable emotional exhaustion it employs to consider our existence. *A gorgeous animation from Adam Beckett that observes the balance, confusion, and repetitive nature of motion in life cycles in life that seem to endlessly disrupt and contradict time.* Relevant Sources: More notes (some incomplete) from my research based on humor and existentialism:
A short instance from an academic article relating humor to existentialism: https://search-credoreference-com.proxy.lib.ohio-state.edu/content/entry/gwexist/humor/0 Questions Raised & Needs: I have finally found a path for this research that I have been conducting. But I am still wary of how I want it to come across to the audience. I have decided to investigate actually having the audience 'say back' phrases they are told, and have them in a more interactive setting. From this idea:
Next Steps: Create a rough animatic and a list of hard statements for an audience to feel comfortable saying. Finish up Chuck to a comfortable point, make use of recording software and After Effects to lay out the storyboard and script timing. Investigate the impossible shape creation and how this can be realized in 3D forms. -Taylor Olsen 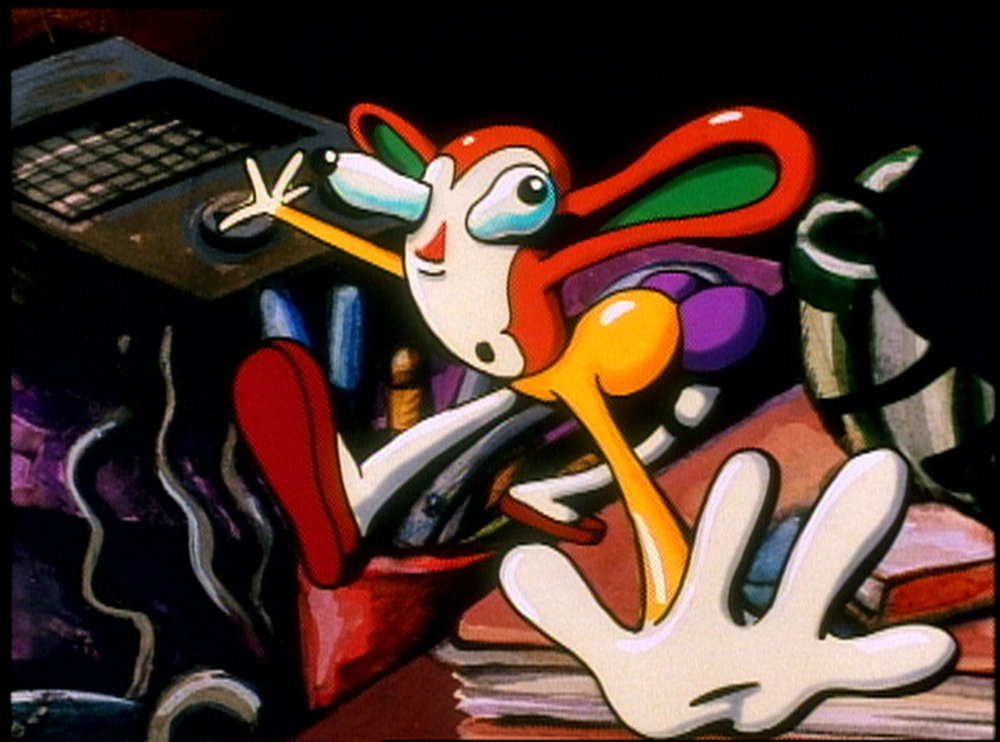 *A still from the animation "Joy Street" by Suzan Pitt*
*Revised concept file* Approach: This week I began to consider why I am spending so much time on researching the idea of existentialism involving humor, to create an animation from such, and the consideration of how we choose to live compared to others. I also questioned why my project was important to myself or to anyone around me. In the progress towards understanding humor more, I realized that humor (from my readings) was often just a coping device to hold ourselves together in a tangled world of emotional distress. It's a release of chemicals that we need to balance, but is also an abusive relationship between our own chemical balance and feeling secure with our minds. I feel lost with this project, I feel like my own sense of humor has now dissipated exponentially based on my readings. As I had found before, having knowledge can correlate to having less of a sense of humor, but this could also be a change in what I determinedly find funny in the first place. I didn't get as much work done as I'd hoped (aimed more towards my creation of a solid script and animatic), and some books that I wanted to investigate were either checked out, or were too 'rare' for the library to lend to me. But, seeing as what these initial readings have caused, I don't feel like I should go any further just yet with my research, and focus more on creating. Other classes have definitely helped with creating more and finding a calming atmosphere in the realm of animation and modeling, but don't feel as rewarding as doing my own work and exploring the connections that I could be making to my creative output and myself. Choices Made: I've decided that I overloaded myself with the amount of readings, and have some apprehension reading more into the topics I have decided to explore. I think the current mental state of our beings is often conducive to the quality/the type of work that is created. Being in the correct mindset makes all the difference when attempting to convey mood, acquiring the 'zenith' and immersion of our technical skill, and abdicating ourselves completely to the mundane/archaic routines that may be holding back our process. My professor suggested some short films for me to watch. Many of the films included dark themes associated with death, life, personal tragedy, hallucinogenic happenstances, and ludicrous actions that revolved around the ignorant nature of humanistic actions and the caveats associated with our own self-preservation. Many of them were beautifully animated, making them all the better to analyze and extrapolate the necessary elements needed to cobble together a reasonable/completely ridiculous theme behind the actions. Something that stood out to me, was the loss of others versus myself. I've had many relationships between friends and family gone due to death, suicide, and distancing ourselves altogether. Something that always came back to my mind was my Grandfather, Wayne. When he died, I found only one aspect to remember him by: a single silver coin that had been rubbed down till it was smooth...abnormally smooth, like someone had been holding it for years and years. I asked my grandmother if it was his, and she hadn't a clue whether or not it was. I didn't care, it reminded me of him. I want to take that coin and find the largest frame possible and place it right in the center, just to give some sort of feeling of wholeness and closure to a memory. Something larger than myself and what I could hope to understand; relating back to my topic: something existential and humorously small that it still holds a large emotional impact on myself. Relevant Sources: Below are the [completed] notes that I compiled from the readings of Stephen Leacock, articles relating to finding humor in animation, and some quick notes on the animations that I found relating to darker themes in animation.
Questions Raised & Needs:
My next steps include really hammering down a script, getting Chuck to a comfortable point of where I feel like he can be utilized in my 2D/3D crossover, and pushing towards feeling okay with how this animation is going to look. I need to drop my reservations about how this animation will turn out and being to create. I think having the drive to create and analyze after it has been done, but also reflect on an in-progress bias is the way to go at this point. I'm not necessarily sure how I want to proceed now, but that shouldn't stop me. -Taylor Olsen 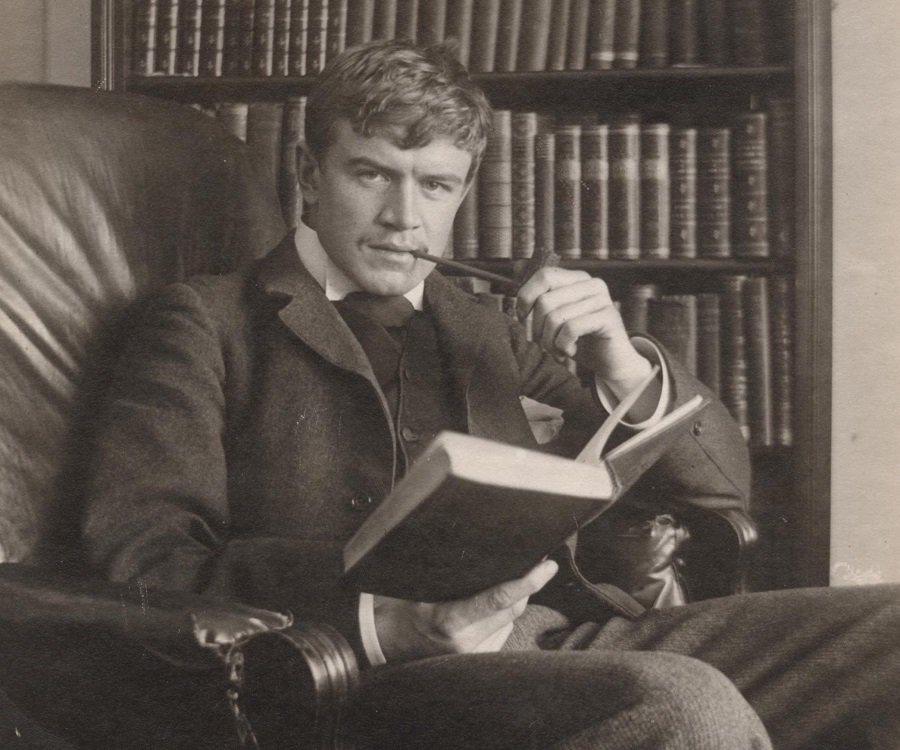 *A photo of young Stephen Leacock, Canada's beloved Humorist - Circa 1915*
Approach:
This week began with showing our completed explanation videos to the class, and completing my "Final" proposal for my class regarding the project I would work on for the next 4 weeks. I thought that the rest of the class made good videos, and mine was not necessarily the best one of them. I regarded most of them as situational depending on the format. Most were more whimsical in their approach, and some were serious. I think it would benefit my classmates and myself to help them with video-editing software if they want their videos to have more impact, but only if they deem necessary. I also read one of the books on my list of research regarding Humor & Existentialism. "Humor and Humanity" but Stephen Leacock. I also happened to be a subject of testing for Abby Ayers and Victoria Campbell on their project based on learning from interactive experience. I dressed up in a Motion Capture suit and they attempted (with the help of a peer) to integrate moCap software directly into Unity. Choices Made: A hard decision to make was how to lay out the rest of my schedule for the remainder of the 4 weeks. It seems like a lot to handle based on the work for my other classes. But I have a feeling that once I get rolling with the script and the storyboard that relate back to my notes. I wasn't sure where to start with all of the readings that I could implore, but I decided on the book that was the oldest as to have a solid base on my research; that way I could see the change through history and how it affected and was also simulated in recent humorous works. Even though the actual reading wasn't dealing with the term "existentialism", it actually made use of it's "Humanity" in the title and had some interesting points on living, dying, how we perceive ourselves and others, and as well how others have become accustomed to accept anything that may be given to them in a "neat package". I feel like because of the time period of this book, many of the findings may not be true, but it is interesting to see a comparison to present day and how many views of humor were shown and portrayed previously. Relevant Sources: Some quotes from "Humor and Humanity" [Stephen Leacock - 1938] with page number included: 13-It squares exactly with the remarks of the philosopher Thomas Hobbes, of the seventeenth century, who expressed his incisive thought with a point and brilliance given to few. "The passion of laughter," he says, "is nothing else but a sudden glory arising from sudden conception of some eminence in ourselves, by comparison with the inferiority of others, or with our own formerly." 13-It thus appears that our sense of humor, like so much else about us, sprang from lowly and even discreditable origins. With certain races of mankind, humor never seems to have got beyond this primitive brutal stage of cruel exultation. 17-Humor, in other words, has changed from a basis of injury or destruction, to what one may describe as a basis of ‘incongruity’ or ‘maladjustment’. 34-[Punsters] Common observation shows that his activity is a menace to society. It runs easily to a sort of mental degeneration in which the unhappy victim tries to make puns all the time, hears only sounds and not ideas, his mind as vacant as a bell waiting for its clapper. Many people hate the idea of drinking because of drunkards-and so do many hate puns because of punsters. Poetic justice therefore warns them in time. 46-But this is only in the same way as a person may be sentimental without sorrow, pious without religion and didactic without learning. It is this possibility of replacing true with with imitation, gold with dross, that has led to a tendency to degrade wit as the crackling of thorns under a pot. 53-This lack of proper terms to designate their art, as felt by humorists, has been felt and remedied in other branches...But the humorist still has no better terms than to ‘write a take-off’, or ‘make up a parody’, or to ‘give an imitation’, and so on. This cheapens his whole art in the literary sense. 57-The boy stood on the burning deck Eating peanuts by the peck. The flames rolled on, he would not go Because he loved the peanuts so. 60-Those who try to make people laugh, necessarily get afraid that they may not see the point and won’t laugh, or won’t laugh enough. Hence the tendency to make the point sharper and the angle of vision wider, to respond to the cruel demand, ‘louder and funnier’. ...And so on. A quote that really stood out to me from Leacock: "The price paid for knowledge is the loss of the eye of innocence. Very likely we enjoy things better if we don’t know too much about them. I have often noticed that music seems to give great pain to people really musical and that an art gallery irritates the artist." How this is related to humor is interesting in itself. Having an eye for intelligent conversation may lead to an individual not seeing the full picture of the situation, but having little to no regard for anything intellectual may lead a person to laugh at anything and not think of the consequences from finding it humorous. This isn't necessarily true, based on the idea that mood should be a factor, but is something I wonder about testing for my animated sequence I plan to create. Questions Raised & Needs: This week I had many doubts about my ability to convey my ideas. But a reading from our professor expressed that having no clue about a study is necessary to explore and "play" with the tools around us. According to a reading assignment from a writer Rachel Philpott, "I believe that practice-led research that uses ludic (showing spontaneous and undirected playfulness) research methods must achieve a fine balance between methods of playful diverse exploration and analytical specific exploration in order to be successful." From this statement my questions began:
Next Steps: For my steps for this week I plan to get my rigged-character Chuck to a point where I feel comfortable animating him in a short narrative story. I also would like to determine whether or not to explore 3D or Live-Action backgrounds and see if they strengthen the narrative altogether. I want to read more books regarding humor, and find books that are about existentialism and ontology (branch of metaphysics dealing with the nature of "being" [alive]). As for the research from the readings, I believe I can use them as a stepping stone for my script and a basis of support for my explanations to peers or an audience that may choose to watch the short that I create. -Taylor Olsen 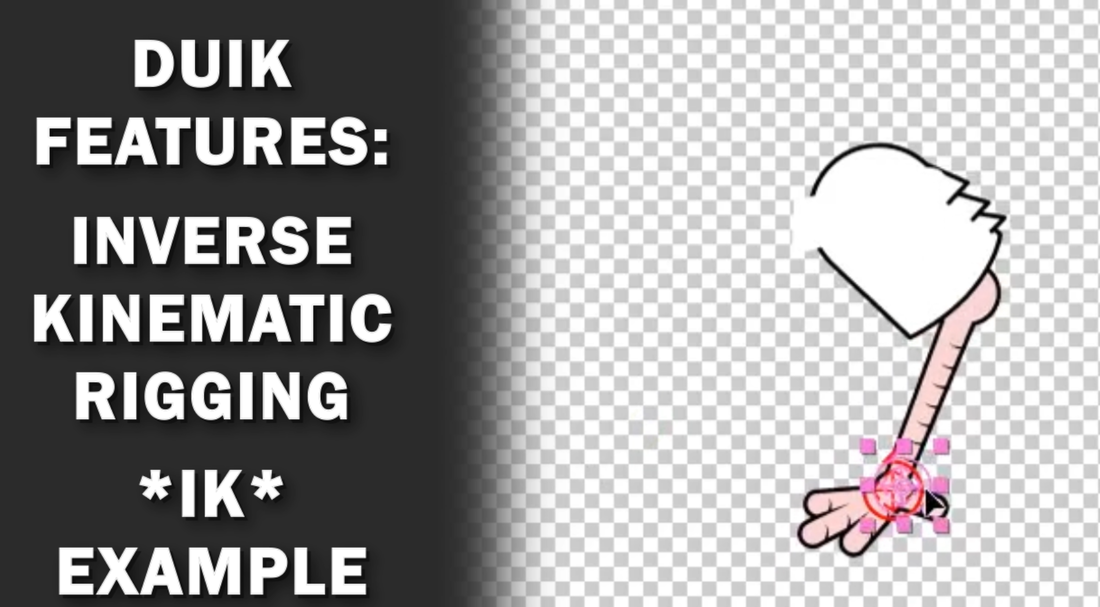
 Approach: This week included creating and discovering better ways of improving my explainer video and where to begin with my research topic for this semester. It mainly began with myself realizing that I did not have a clear idea as to what I should study for the next 4 weeks, as this would serve as the stepping stone to more research or switching my idea entirely to a new topic. For my topic, I want to explore and possibly better understand the developmental effects of humor on people throughout their childhood, adolescence, and adulthood; but aimed specifically towards how animated works could be the main cause or an influencing factor. I’m still finishing up my progress on my explainer video and have uploaded my current progress to my Vimeo page. Parts that I still want to change are the sections that explain the masking techniques and the Inverse Kinematic part. I also went to the Ohio State University library (Thompson) and checked out some books based on the philosophy, anatomy, intricacies, and depth of different types of humor to begin my research on my topic. I do not want to fully upload this video for self-preservation reasons and fear of someone copying my character, so I will use screenshots instead. My script was also re-written to accommodate extra spaces between the explanations and a "breather" for the audience between different sections (you can find the download link above). *A screenshot of "Archer" - One of the inspirations for my character* Choices Made: For this week I mainly worked on my explainer video. Some of the choices I wanted to explore were how to make the video more interesting than my initial animatic. I used a flat grey background and white text to emphasize what I wanted to explain visually versus through audio. I feel if the backgrounds were too highly detailed, it would detract from me giving a clear explanation about the overall project. I also made all of my textual elements and visual cues fade in/out, shift position smoothly, and used masking along the edges of my videos for clean transitions and for side-by-side comparisons. My actual outcome I thought came across much stronger than my initial animatic, which makes me believe that I should create animatics for these types of projects in After Effects first rather than later; unless it’s an actual animation versus explanation video. I also used a dual drop-shadow technique on the text. The first was for a solid drop shadow that made the text pop-out with some depth, the next was a soft drop shadow to make the text look like it was even further out as separate from the flat background. I also used some subtle animation techniques such as rotation and opacity changes, as well as a trim-path for animating a pen-strokes regarding my “next steps” sections. I also went back and re-recorded my audio in the video itself and made sure to fix the issues with the MONO vs STEREO tracks I was having such a hard time with. Relevant Sources: I used a channel on YouTube that I often go to for motion-graphics inspirations called “Mount MoGraph”. I have listed his channel link below: www.youtube.com/user/mtmograph His tutorial videos are often helpful and go through the steps clearly when he needs to make sure his audience understands. It also helps that he shows the final product in the beginning and then proceeds to act like you will have no prior knowledge; I often find this the most effective way to teach as it makes a clearly defined path to the current problems and future uses of After Effects techniques. I also checked out a number of books that I believe will help me with my research in the future for my topic this semester. I have also listed them below (note – not cited correctly):
Questions Raised & Needs: Some questions I have regarding my video:
Some questions for my books I’ve checked out:
Next Steps: For my next steps I plan to edit my video one last time to make sure that I have all the assets I need and the explanations are clear and concise. I want to record a short section involving DUIK controls and how they can be controlled by "your friend" moving your hand to a specified location (this will be in live-action). For the other, I want to start reading my books and come up with a clearly defined idea for my research about humor, existentialism, and behavioral psychology. I will review the notes from my professor regarding what to change and expand upon, and come up with a better reasoning behind my research and where it will lead myself and the audience that happens to find interest. -Taylor Olsen  *An image of yours truly. Being weird as usual.*
|
|||||||||||||||||||||||||||||||||||||||||||||||||||||||||||||||||||||||||||||||||||||||||||||||||||||||||||||||||||||||||||||||||||||||||